Overview User Guide
Note: This guide assumes that you’ve already successfully installed Overview. If you have not installed Overview, learn how to do so by reading our Overview Installation Guide.
Welcome to Overview
Overview is the dashboard you've been missing in Teams! It surfaces important chats, channels, files, meetings, and ongoing calls– all in one easy-to-use place. Not only is Overview is designed to save time by eliminating the need to search through the Teams interface to find necessary information. It also gives you the flexibility to add, move, and hide information, enabling you to organize your workspace in a way best suited to your needs.
Accessing Overview
Since Overview is designed to be a ‘one stop shop’ for your Teams information, we highly recommend pinning the Overview tab to your Teams sidebar for easy access. If the app is not automatically pinned to your Teams sidebar, it may be under your apps. Right-click to pin.
Overview Navigation Guide
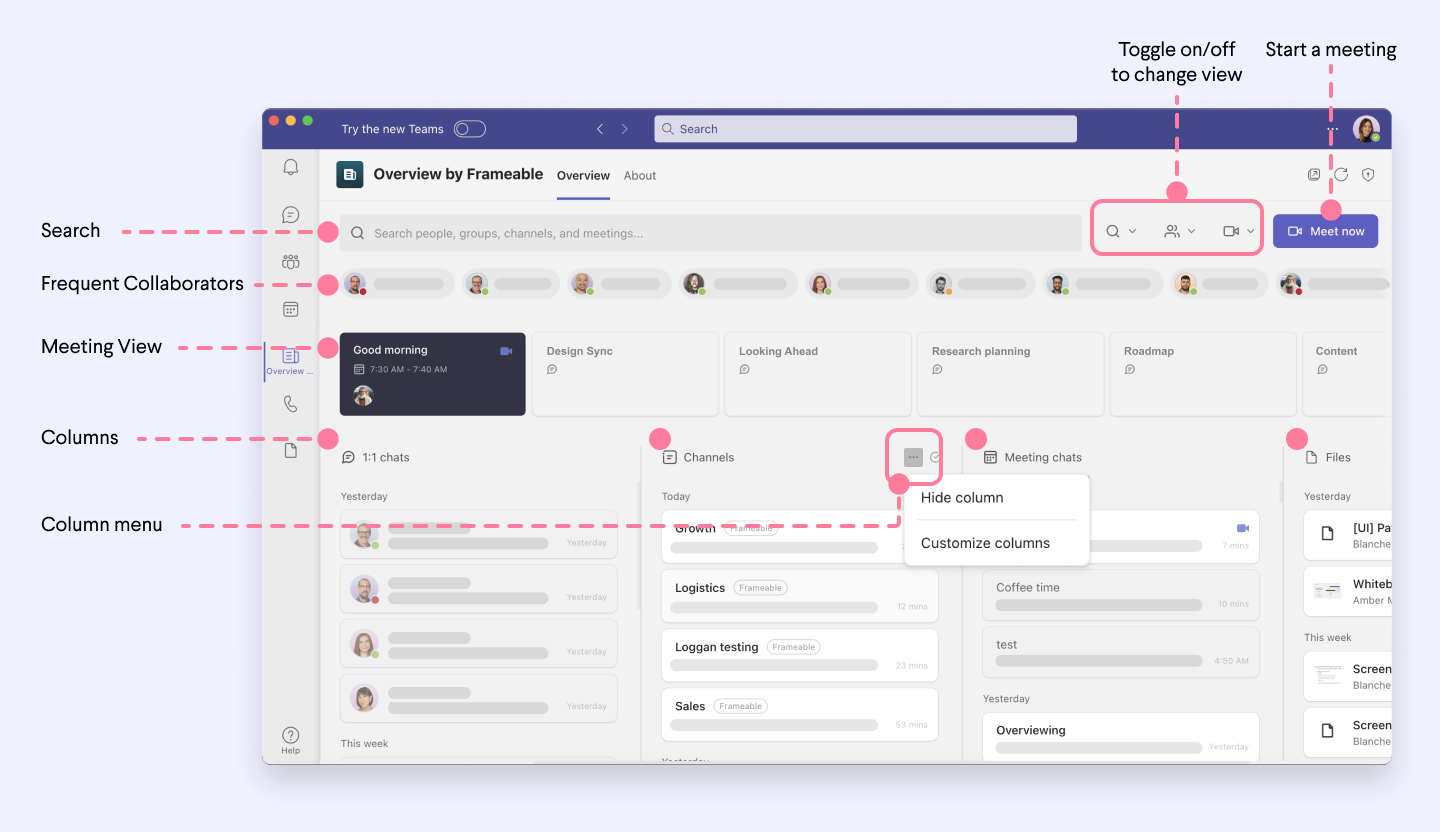
The Overview dashboard can be divided into three main parts:
Frequent collaborator & live and recent meeting arrays
These sections provide at-a-glance status information and quick links to get you connected to meetings and colleagues without having to leave Overview.Columns
The columns display important information found in various areas of the Teams interface. These columns include calendar, chats, channels, and files.Tools and settings
There are a number of handy tools and settings available in Overview: a search function, a ‘meet now’ button with a variety of call choices, and customizable options for displaying the information most important to you.
In the overhead banner where the app title is displayed, you will also find buttons that allow you to pop the app out into a separate window and a manual refresh button.
Frequent collaborators

This is a handy visual representation of the current status and availability of the people you work with most. The colors of the dots that appear on each person’s avatar correspond with the Teams status colors, which gives the opportunity to determine if someone is away, in a meeting, available, or offline at a glance.
Live and recent meetings
The live and recent meetings array shows meetings that are currently in progress or have recently concluded.
Array navigation
- Meetings currently in progress are indicated by a navy blue color and purple camera in the upper right corner of the meeting tile/box. As new meetings are started, they will appear in first position on the left end of the meetings array.
- Meetings that have recently ended appear gray with faded text.

Reading meeting tiles
Active meetings are navy colored and have purple cameras in the upper righthand corner.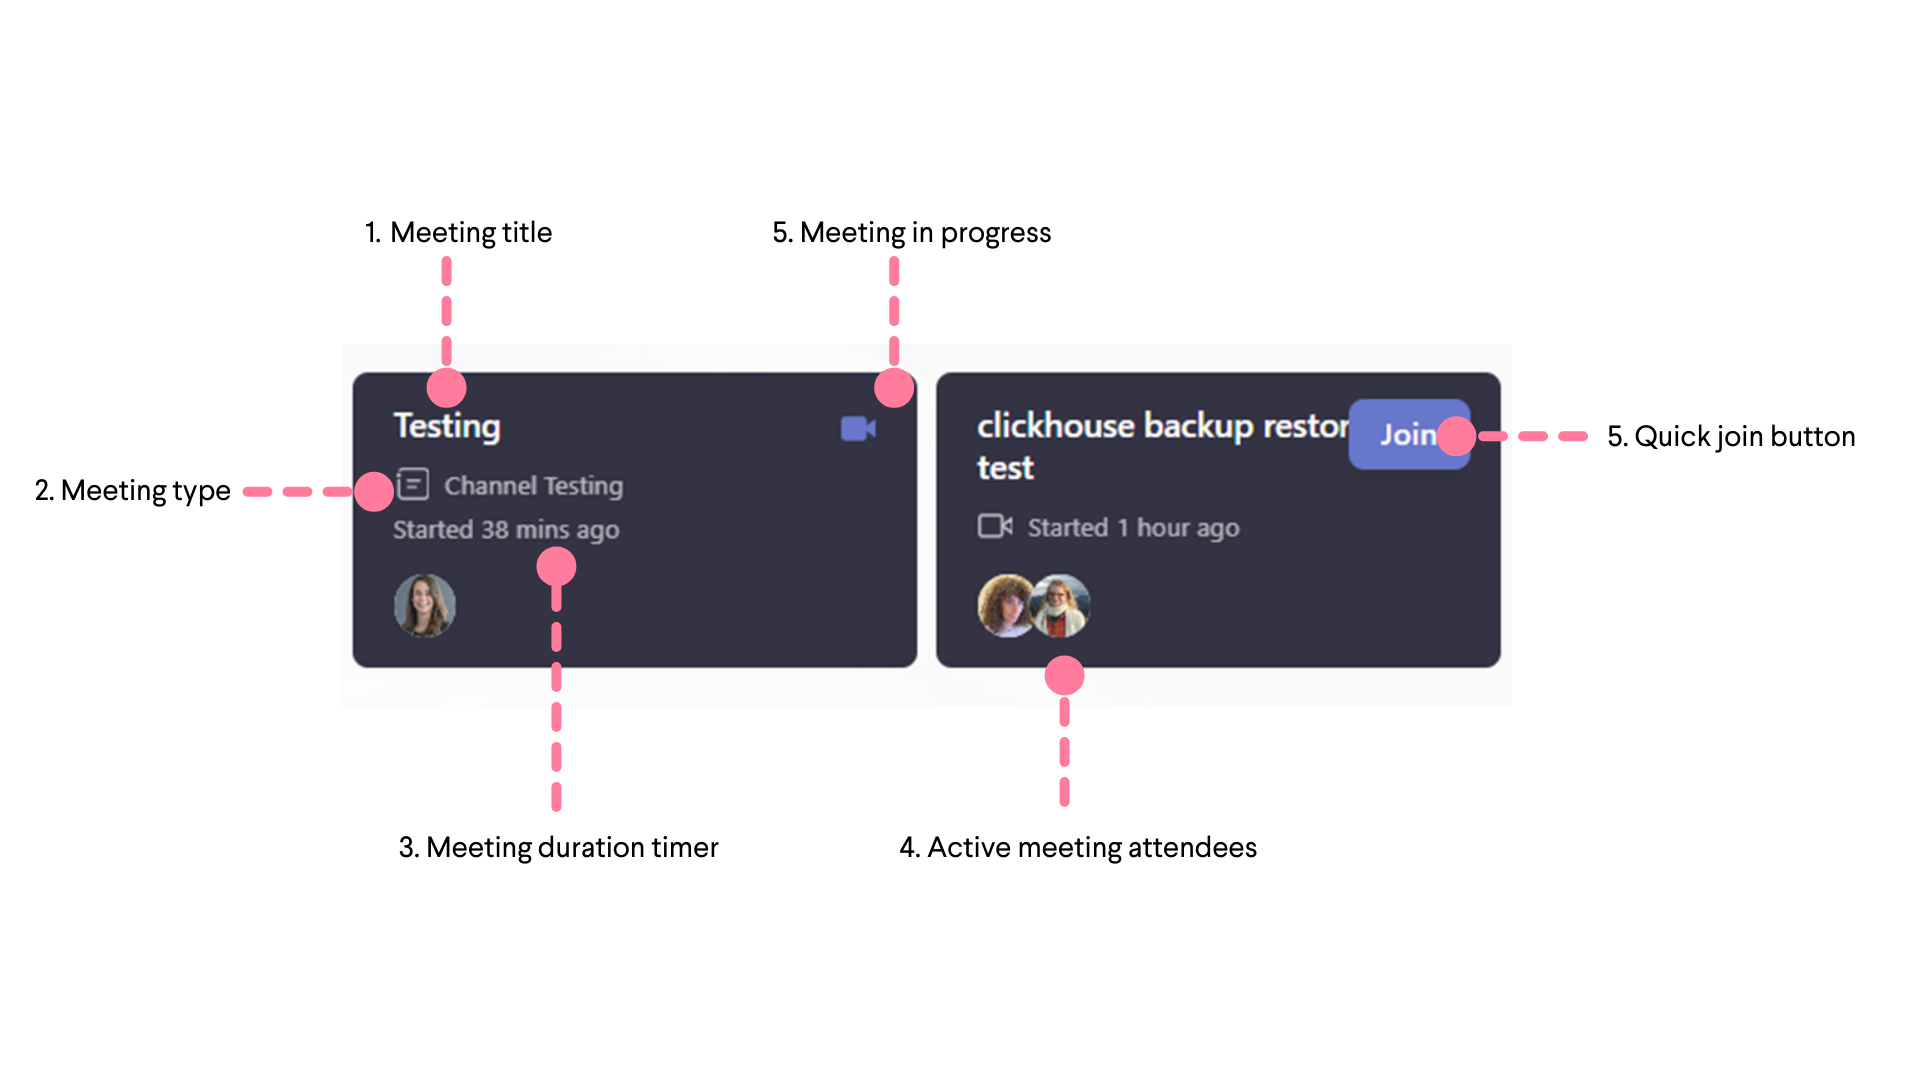
- Meeting title
- Meeting type. A notebook symbol indicates a meeting that is associated with a channel. A camera symbol indicates a regular meeting.
- The meeting duration timer indicates the length of time a meeting has run. For meetings that have concluded, the timestamp shows when the meeting ended.
- Active meeting attendees are represented by their Teams avatars.
- Join buttons appear on the upper right corner of the tiles when you hover over the purple 'meeting in progress' camera icon with your cursor. These buttons are available even for meetings that have concluded- allowing the opportunity to reopen and resume a closed meeting.
Meeting visibility
The current meetings array populates differently for individual users depending on their membership to channels and whether or not they appear on the invitation list or group for a meeting.
A channel meeting in session will not display for a person who is not a member of that channel. A scheduled meeting will not display for someone who is not part of the invitation list.
To ensure that meetings are visible and open to all users within your Teams tenant, we recommend using an ‘all company’ listserv when creating a meeting. This can be applied in advance when scheduling a meeting through Outlook or Teams calendar, or when starting an instant meeting through the ‘Meet now’ modal click here to skip ahead in this guide to the ‘Starting a new meeting’ section.
Column features and details
Calendar

The Overview calendar is a compilation of your Outlook and Teams calendars. All meetings that appear on your calendars will appear in this column in the form of individual meeting tiles.
Calendar modals

Meetings in session in your Calendar column will be indicated by a purple video camera in the upper right corner of the meeting box. You will see the same meeting appear in the current meetings array highlighted in deep blue. Clicking on either will bring you to a calendar modal and give you the opportunity to click the ‘join now’ button for easy access to the meeting without leaving Overview.
Starting a new meeting from Overview
Users have the opportunity to start different types of meetings directly from the Overview dashboard.
To start a meeting from Overview, click the ‘Meet now’ button in the upper right corner of the dashboard. Clicking this button will bring up the ‘Meet now’ modal, which will display the different meeting options available to choose from.


Chat Columns
Three columns in Overview are dedicated to displaying chat messages that are sourced from Teams Chat. These are: direct (1:1) chats, group chats, and meeting chats. The Teams interface does not separate these different sources of communication within Chat, preferring to organize all messages in a single bucket and arranged in chronological order. Overview’s chat columns are divided into the aforementioned sub categories to help users find and receive alerts to important messages quickly and easily.

- 1:1 Chats displays chat messages between you and one other user.
- Group chats displays chat messages where 3 or more users are on the message list
- Meeting chats displays messages that were started in Teams call chats.
Column Sorting
Further organization can be applied to these columns based on individual users’ display preferences. In the 3 dot menu at the top of each column, the three chat columns have options to sort messages chronologically or alphabetically.

Chat modals
When clicking on any of the individual tiles that are displayed in the chat columns, a modal will pop up with details and actions related to that particular message thread.
Chat modal navigation
The general layout of modals is the same for each type of chat:

- The modal title will appear as the name of the meeting, if a meeting chat, or the name(s) of the chat recipients.
- Tab sorting for the main body of the modal. Users have the option to look at the message log, or files associated with that conversation or meeting.
- A message box with options for attachments with markdown supported
- A meet now button that will allow you to join a meeting in progress or start an instant Teams call.
Between the three types of chats, there are slight variations in what is displayed within their respective modals. These unique details were chosen specifically for the type of interaction to provide the most useful tools and information available.
1:1 Chat modal unique features
The 1:1, or direct chat, modal includes features that can be used to schedule and connect with colleagues easier.
- Schedule tab to preview the other person’s schedule for easy reference and coordination.
- Teams status
- Contact information
Group chat modal unique features
The group chat modal provides options for interacting with each member of the group chat individually as well as options on how you would like to call an instant group meeting.
The 'Meet now' button in group chat modals gives you the option of calling each member of the group individually (meaning, their devices will ring as if they've received a call through the native Calls app in Teams), or, starting an instant meeting that is visible and joinable from the group chat message log.
The participants lists shows the avatars of the members of the chat. Clicking on an avatar will produce a quick action list that you can engage with for that person - start a direct chat, view their schedule, and see a list of files that have been shared directly between you both.
Meeting chat modal unique features
The meeting chat modal has one unique feature to set it apart from the other two chat modals. A 'Happening now' button, which allows you to quickly join a meeting that is currently in session.
- Happening now button - Meetings that are currently in session will have a separate button that alerts you to when the meeting is live. When the meeting concludes, only the ‘meet now’ button will remain, allowing you to restart the meeting with all attached chat messages and files preserved.
Starting a new chat
To start a new chat message from the Overview dashboard, click on the ‘New chat’ button in the upper right hand corner of the screen.

A pop up window will appear where you can enter an individual or list of names, emails, or groups you would like to start a new conversation with.


Click 'Start conversation' and a new message will appear in the corresponding column depending on whether you start a group or direct chat.
Channels

All of the channels associated with your Teams tenant are represented in this column. This column defaults to showing only unhidden channels but if you would like to see all channels represented here, you can click the three dot menu at the top of the column and select ‘show hidden channels.’ Like with the chat columns, there are also options for sorting the channel information chronologically or alphabetically.
Channel modals
When clicking on any of the individual tiles that are displayed in the Channels column, a modal will pop up with details and actions related to that particular channel.
- Channel name
- Tab sorting for the main body of the modal.
- The 'New post' button allows you to post to the channel without having to leave Overview.
- The 'Meet' button starts an instant channel meeting.
- Active participants list - a list of the active members of that channel.
Starting an instant channel meeting from the channel modal
To start an instant channel meeting from a channel modal, start by selecting the tile for the channel you wish to host a meeting in. When the meeting modal pops up, select the ‘Meet’ button in the upper right corner.
Once selected, the channel modal will disappear and a new pop up will appear requesting a title for the meeting:
Enter a meeting title and press continue. A Teams call will start and Overview will open the channel modal back up. You will see the meeting reflected in the channel posts.
Exiting the modal, you will see the meeting in session reflected in the Channels column. You will also see it appear as an active meeting on the current meeting array.
Files

The Files column in Overview displays files that you have shared, have been shared with you directly through chat messages or channels.
Tools

Search bar
The search function in Overview is a handy way to sort quickly through messages, upcoming meetings, and shared files to find the information you need.
The ‘Meet now’ and ‘New chat’ buttons
These have already been covered in detail earlier in this guide within related columns sections:
• Click here to read more about the ‘Meet now’ button.
• Click here to read more about the ‘New chat’ button.
Customization options
There are a number of ways you can customize the Overview dashboard to display information most important to you, in a way that’s best suited to your personal style.
1. Select Content
Clicking the eye symbol in the upper right corner of the Overview dashboard will produce a dropdown menu with options for selecting and deselecting items you wish to display on your dashboard.
2. Settings
The cog icon in the upper right corner of the dashboard will open a display settings modal when selected.
From this modal, you can
- Choose to apply a curated photo to your dashboard background or upload your own custom background.
- Sort frequent collaborators by their Teams statuses (available, away, in a meeting, offline)
- Customize your columns. There are two actions you can take here: Choose which columns you want to be visible on your dashboard by checking or unchecking the boxes next to each. Rearrange the order in which they appear from left to right by clicking on the six dot icon, dragging, and dropping the selection where you’d like it to appear in the list.
- Restore defaults. Clicking this button will return your settings to the Frameable default display.
3. Sort column data
When hovering your cursor over the top of each column, you will see a three dot icon appear. Clicking that icon will open a drop down menu that displays the customization options for that column’s information display.
Using the menu, you can sort information chronologically, alphabetically, quickly hide the column from view, and access a shortcut link to the settings modal to customize your column layout.
4.Open the app in a new window
This is a very helpful feature that allows you to keep Overview open and accessible if you need to navigate somewhere else within the Teams interface.
To open Overview in a new window, click the boxed arrow symbol in the upper right corner of the dashboard.
5.Refresh button
Next to the ‘Open tab in new window’ icon is the refresh button for Overview. The refresh button gives the option to manually reload your Overview page when necessary. Information is constantly feeding into Overview from Teams and rates of refreshing vary per data source. A new chat message will load in under a minute, whereas adding a new member a Teams tenant might take up to 15 minutes.
Conclusion
As we are continuously striving to improve and polish our products, product updates are posted as soon as they become available and incorporated into user guides on a continuous basis. Check back often for the latest updates!
Feedback and feature requests
Please let us know what you think! Our mission centers on making your virtual work and collaboration effortless, which is why client feedback is so vital to our work. If you have any feedback, we would love to hear from you! Email us at any time at support@frameable.com.![]()
Need help?
We’re here to assist you with your Frameable questions!
Book time: https://calendly.com/frameable
Email us at: support@frameable.com
Call Us: 646-710-1703