Events Admin Guide: Rooms
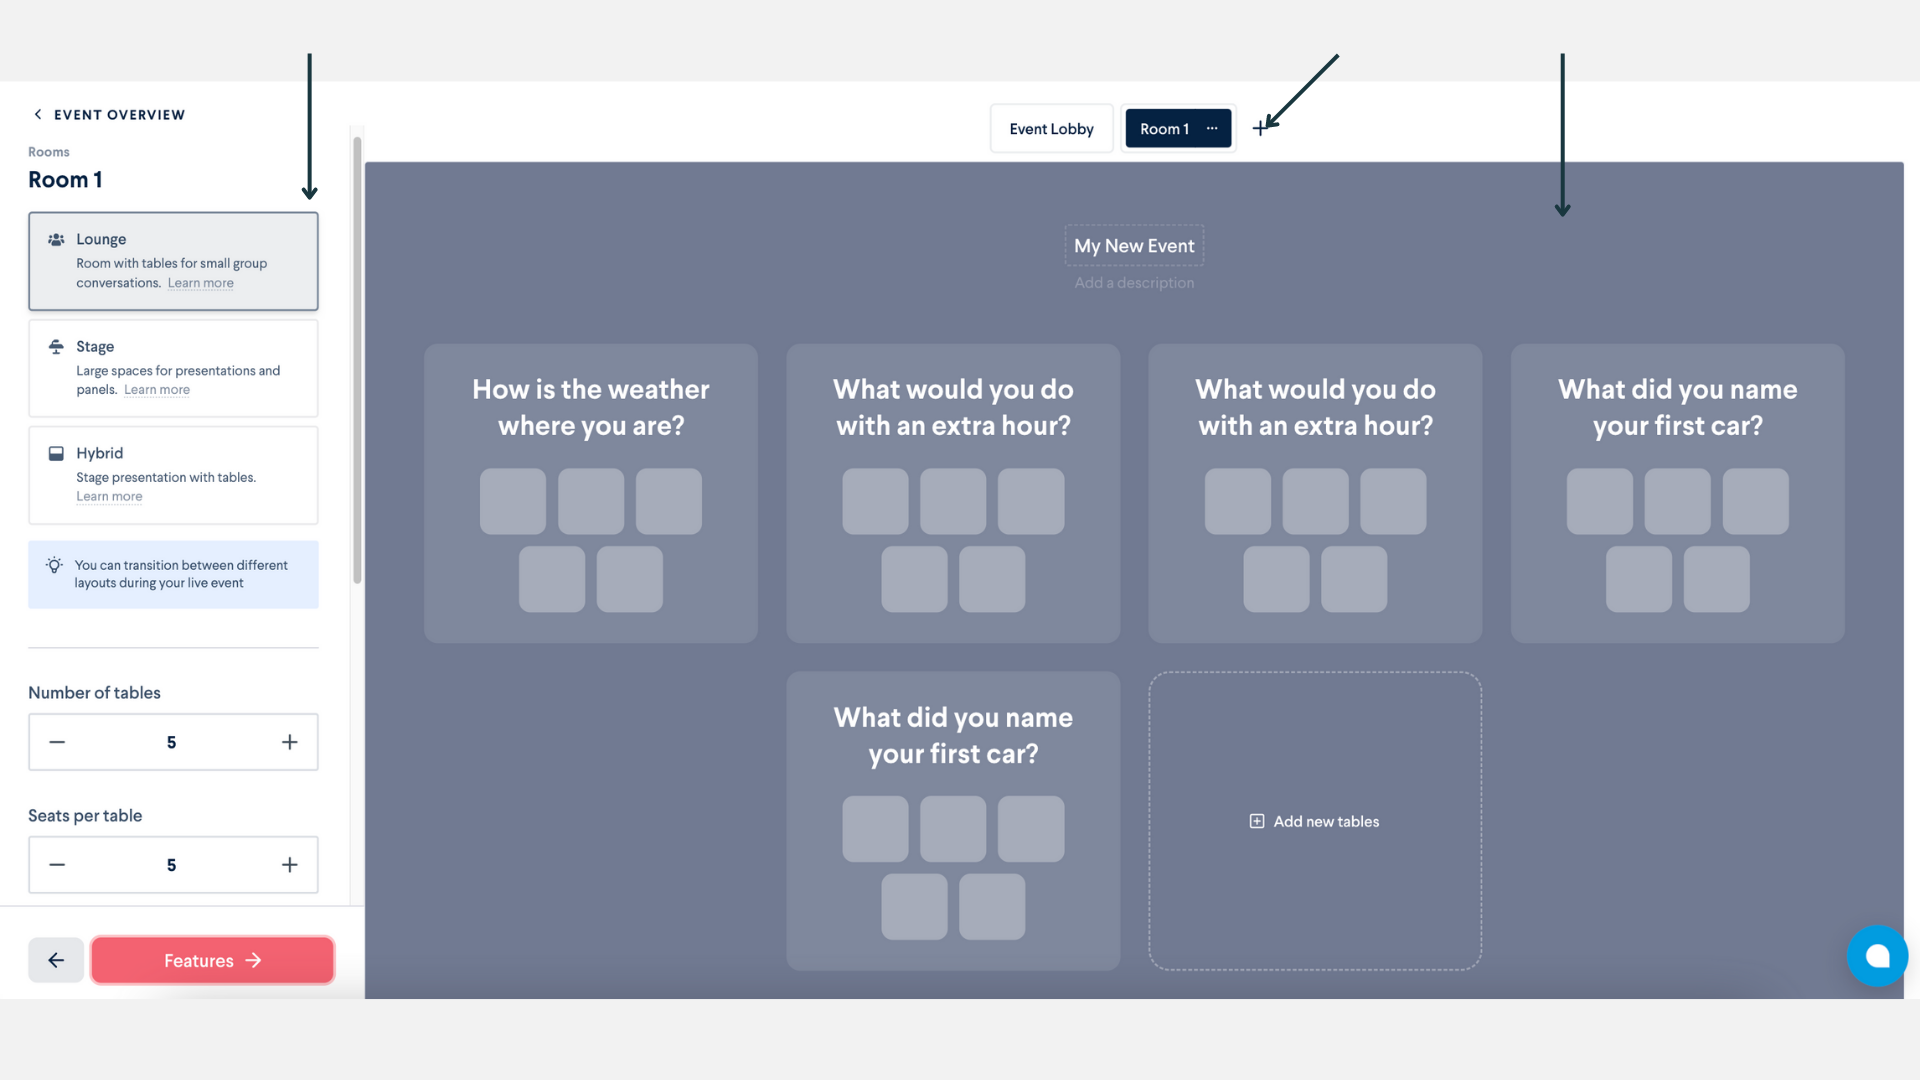
Overview
This is where you can adjust the design and layout of your event with individual rooms. By default, your first room will be set up in the Lounge layout with a series of tables.
Let’s get acquainted with the interface:
- On the left, you will see editing features that will apply to the current room you are editing.
- On the top, you will see the highlighted room you are editing. You will be able to view your “Event lobby” and add additional rooms by using the “+” symbol.
- On the right will be the display area, where you can click on table or room tiles to edit.
Room layout
You can change your room layout in a couple of different ways.
- With your current room selected you may use the tiles on the left labeled, “Lounge, Stage, Hybrid” to change the layout.

- You can use the 3-dot menu next to the currently selected room at the top of the page by clicking the menu, selecting Change room layout, and choosing your desired layout.

- Note that when you change a Lounge room to aStage or Hybrid floor, the title of the floor will not change.
Room Title
To change the room title you must first have multiple rooms. Simply click on the title within the display area, and start typing. To save, either tap “enter” on your keyboard or click away.
Number of Tables
For Lounge and Hybrid rooms, you can opt for anywhere between 1-15 tables per room, depending on your event’s needs. Each table can hold up to 7 people by default, but you can purchase an expansion for your tables to expand up to 15 people each.
There are multiple ways to add or remove tables.
- On the left sidebar, you will see the Number of tables section where you can add (+) or subtract (-) rooms. Note that when adding tables and seats, your over all room capacity will be calculated below.

- You can simply click the “add new tables” outlined button straight from the display area. This will generate a table in which you can change the title.

- You can remove a table by using the specific table’s 3-dot menu, and then clicking “remove table”

Room Logos
You can add individualized room logos if your event has more than one room. The Room Logo will be shown next to your Event logo and displayed in the lobby.
- To add a room logo, you can drag and drop your file or click the upload area to choose from your files.
- Once you have a logo uploaded, you can easily edit, change, or remove it with the options available.

To preview your event logo and your room logo, click “event lobby” from the top navigation or enter your event space by copying your event link and opening a new window.
Room Settings
Notifications are used to alert guests when someone enters or leaves a table and when guests are raising their hand or giving emoji feedback.

By default, notification sounds are turned on in our Lounge layout and turned off in our Stage and Hybrid layouts.
Table customizations
Within the display area of the admin interface, there are many things you can do to customize individual tables within your room. You can edit table topics, add table logos, add information specific to that table by utilizing the info panel feature and create a presenters layout. All of these features are accessible from the 3-dot menu and then clicking “Change table details”.

Table Topics
Changing the table topics will be similar to the way you change the titles of each room.
- From the display area simply click on the table topic and start typing. To save, either tap “enter” on your keyboard or click away.

- You can also do this by opening the table details by clicking on the 3-dot menu and selecting “Change table details”.
- Once the window is open, simply click on the title and start typing.

Table Logos
Adding table logos to your event is a great way to enhance the organization and visual delight for your guests.
- From the table drop-down menu choose “Change table details” This will open a separate modal to start editing from.
- From here you can add a table level logo by uploading a png or jpeg.

Adding Info Panels to a Table
You can add an info panel to the room. Which consists of a description area and a custom link button.
- Find the table you would like to edit.
- Click on the 3-dot menu located on top right corner of the table tile/or table square.
- From this drop-down menu choose “Change table details.” This will open a separate modal to start editing from.

- Toggle the info panel feature to the ‘on’ position. This will open up a text field where you add a description and a custom link button. When guests are seated at that table, they will see a button that expands to showcase the information you have added here.

Adding the Presenter Layout to a Table
You can add a stage layout to any table within a Lounge room.
- Click on the 3-dot menu for the table, and choose from the drop down menu, “Change table details”.
- Within the modal, toggle on Presenter layout.

This will add a stage to your table and will take on the same actions as a Stage room. Anyone who needs to be on the stage will have to be added to the event as a Presenter or Host.