Welcome to Whiteboard
(Note: This guide assumes that you’ve already successfully installed Whiteboard. If you have not installed Whiteboard, learn how to do so by reading our Whiteboard Installation Guide.)
Introduction
Frameable Whiteboard is an intuitive whiteboard tool built for Microsoft Teams. It can be accessed in Teams calls to upgrade your collaborative work experience in meetings, as a standalone Teams app, or as a web platform if you’re ever in need of quick, remote access to your boards.
Whiteboard uniquely provides users with the tools they need to produce boards ranging from structured and operative to free-form and inventive, and everything in between. It is truly a universal tool with flexibility to fit the needs of any organization.
Accessing Whiteboard
There are three ways to access Whiteboard:
1. From Teams
We recommend pinning the Whiteboard tab to your Teams sidebar for easy access. If the app is not automatically pinned to your Teams sidebar, it may be under your apps. Right-click to pin.
Click on the Whiteboard tab on the Teams toolbar to access your Whiteboard homepage.
2. Within a Teams call
Access Whiteboard from within a Teams call to use as an in-meeting collaborative tool with colleagues. Click here to skip ahead in this guide to the to skip ahead in this guide to the ‘Accessing Whiteboard in a Teams Call’ section.
3. From a web browser
Whiteboard can be accessed from a web browser. In your browser's address bar, enter: Whiteboard.Frameable.com. Once loaded, click the 'Log In' button in the upper right corner of the screen and enter your Microsoft Teams credentials to be taken to your Whiteboard homepage.
Navigating the Whiteboard Homepage
The Whiteboard homepage is a repository for all of the boards started by and shared with you, where you can start new boards and make quick edits. To access the homepage, click on the Whiteboard tab on the Teams toolbar. The Whiteboard homepage can also be accessed from a web browser and will display the same options available within the Teams app.
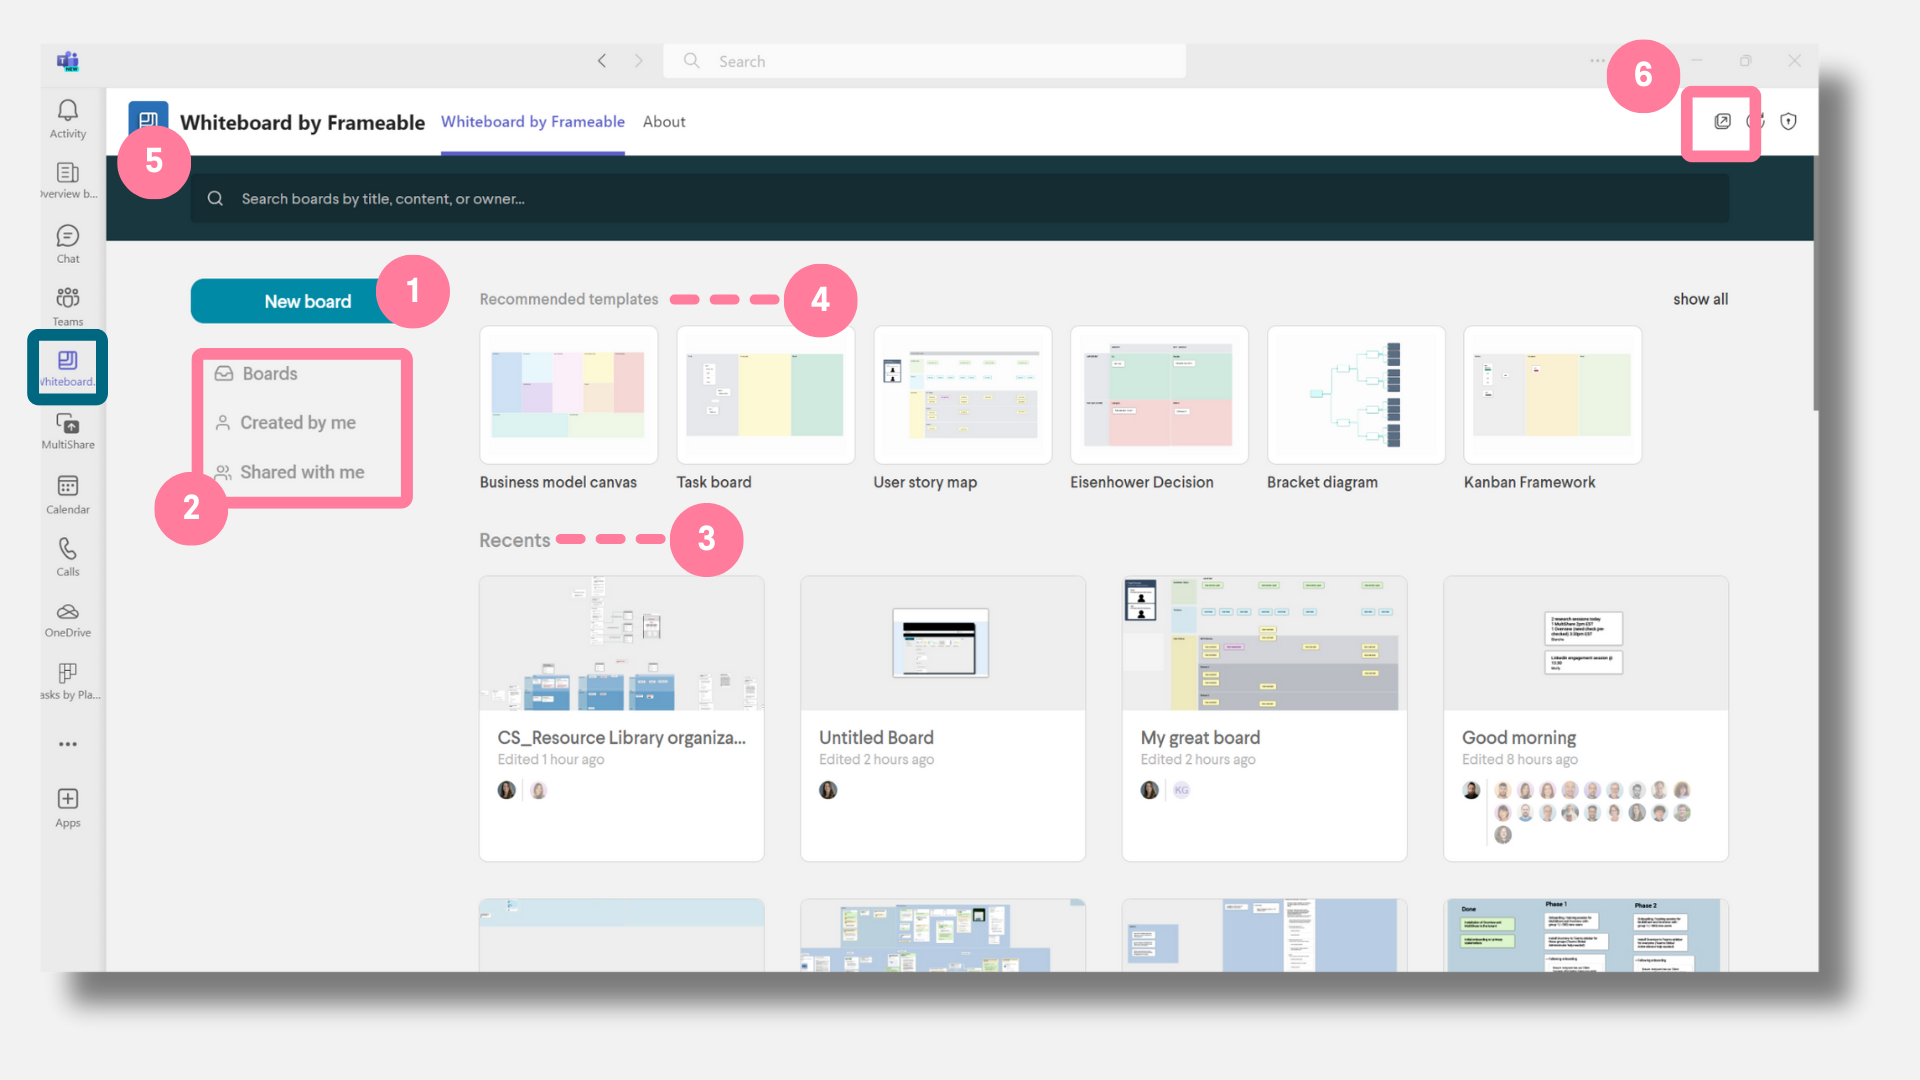
- Click the ‘New board’ button to begin a new Whiteboard.
- There are three ways categories which boards are sorted into on the homepage. Click any of these to quickly sort through your board ‘inventory’ to find what you’re searching for.
- The boards that you have edited most recently will appear as preview tiles for quick access at the top of the homepage.
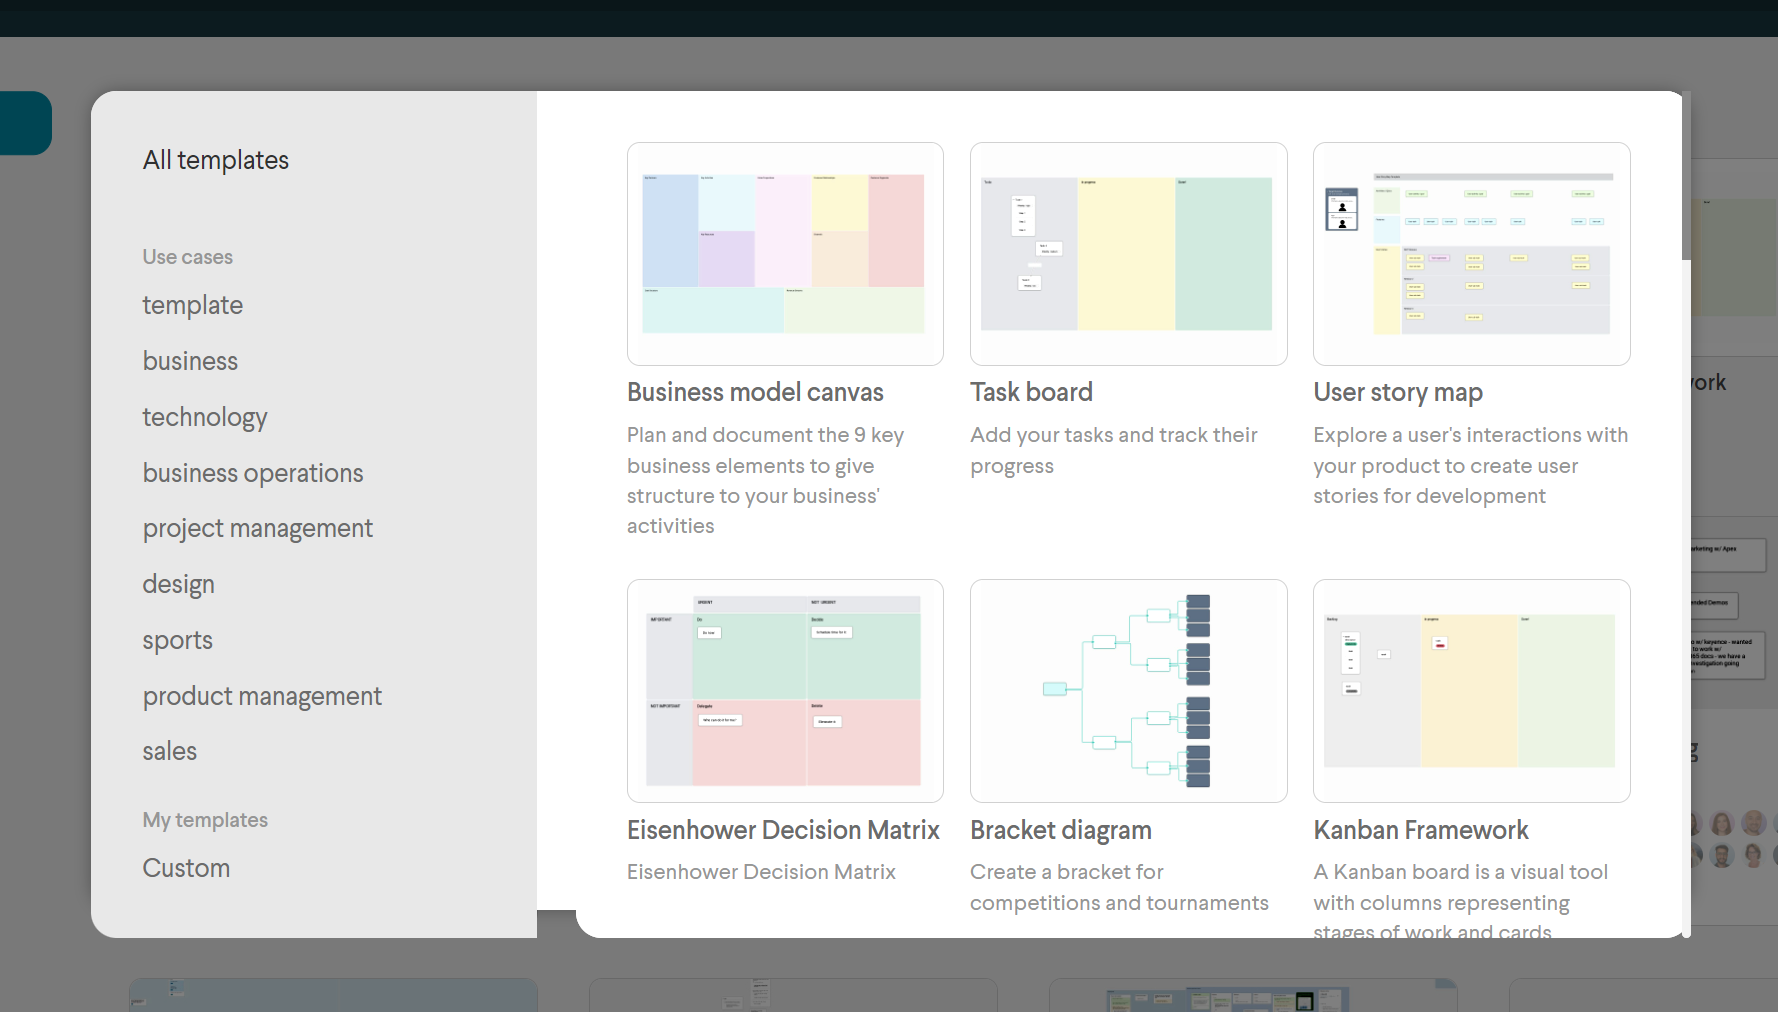
- Get a quick jump on creating a new map by selecting from a variety of premade templates.
- Using the search bar, type in board names, names of collaborators, or board content to quickly find a board.
- Pop the Whiteboard app out into its own window when working in Teams so that you do not have to navigate away from your board when checking other Teams applications.
Reading a Whiteboard preview tile

Your homepage will display all of the boards in a preview tile format. Each tile shows information about the board, who is working on it and when, and gives options for quick edits.
- Board title
- The board owner is the person who created the board. The owner’s Teams avatar will appear on the left side of a dividing pipe on the bottom of the tile.
- Collaborators are non-owners who have access to edit the board. They are also represented by their Teams avatars. If they appear faded, this is an indication that they have been invited to but have not yet edited the board.
- The timestamp gives an indication of the last time the board was edited by any user.
- The top of the preview tile will show a thumbnail image of the board’s contents.
- The quick action menu is accessed by clicking on the three dot menu that appears when you hover over the board tile. When clicked, options appear to make a copy of the board, copy the board’s URL, or, if you are board owner, to delete the board.
Starting a New Whiteboard
There are two places where you can start a new Whiteboard: from the homepage and from within a Teams call.
Starting a new board from the Whiteboard homepage
To start a new board from the Whiteboard homepage, navigate to the homepage within Teams or from a web browser (click here to learn more about ways to access Whiteboard). From the homepage, click the teal button labeled ‘New board.’ Clicking this button will launch a new whiteboard. Once the new board is open, make sure to add a title by typing in the name field located in the upper left corner of the board.

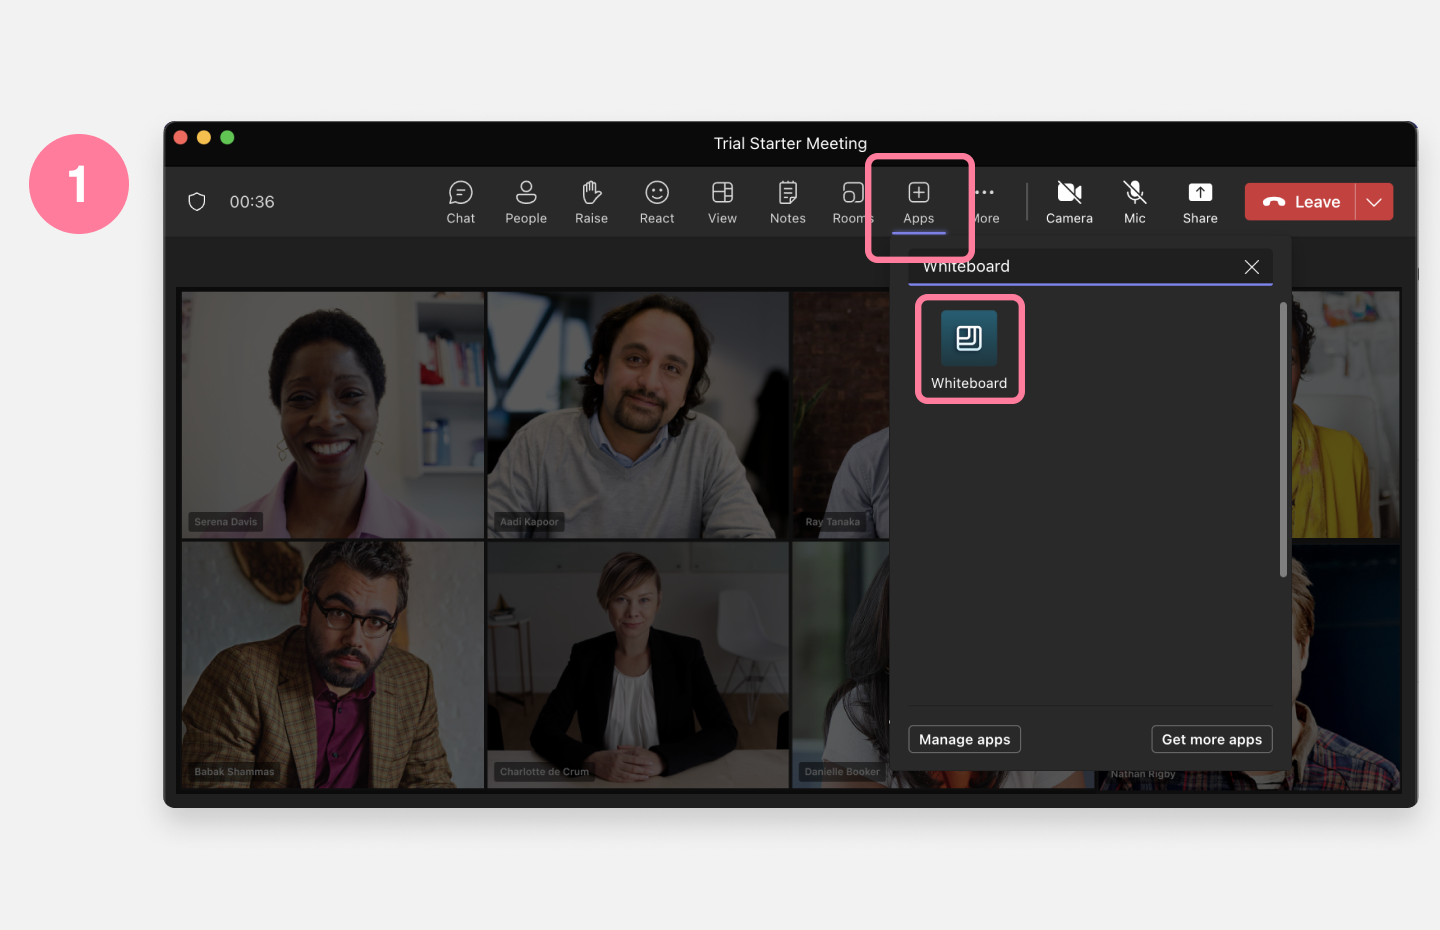
Starting a new board from a Teams call
New boards can also be started from a Teams call.
How to add Whiteboard to an active Teams call.
From within a Teams call, click the “Apps” button from the top navigation bar and search “Whiteboard by Frameable”. Click on the icon to open a welcome modal.
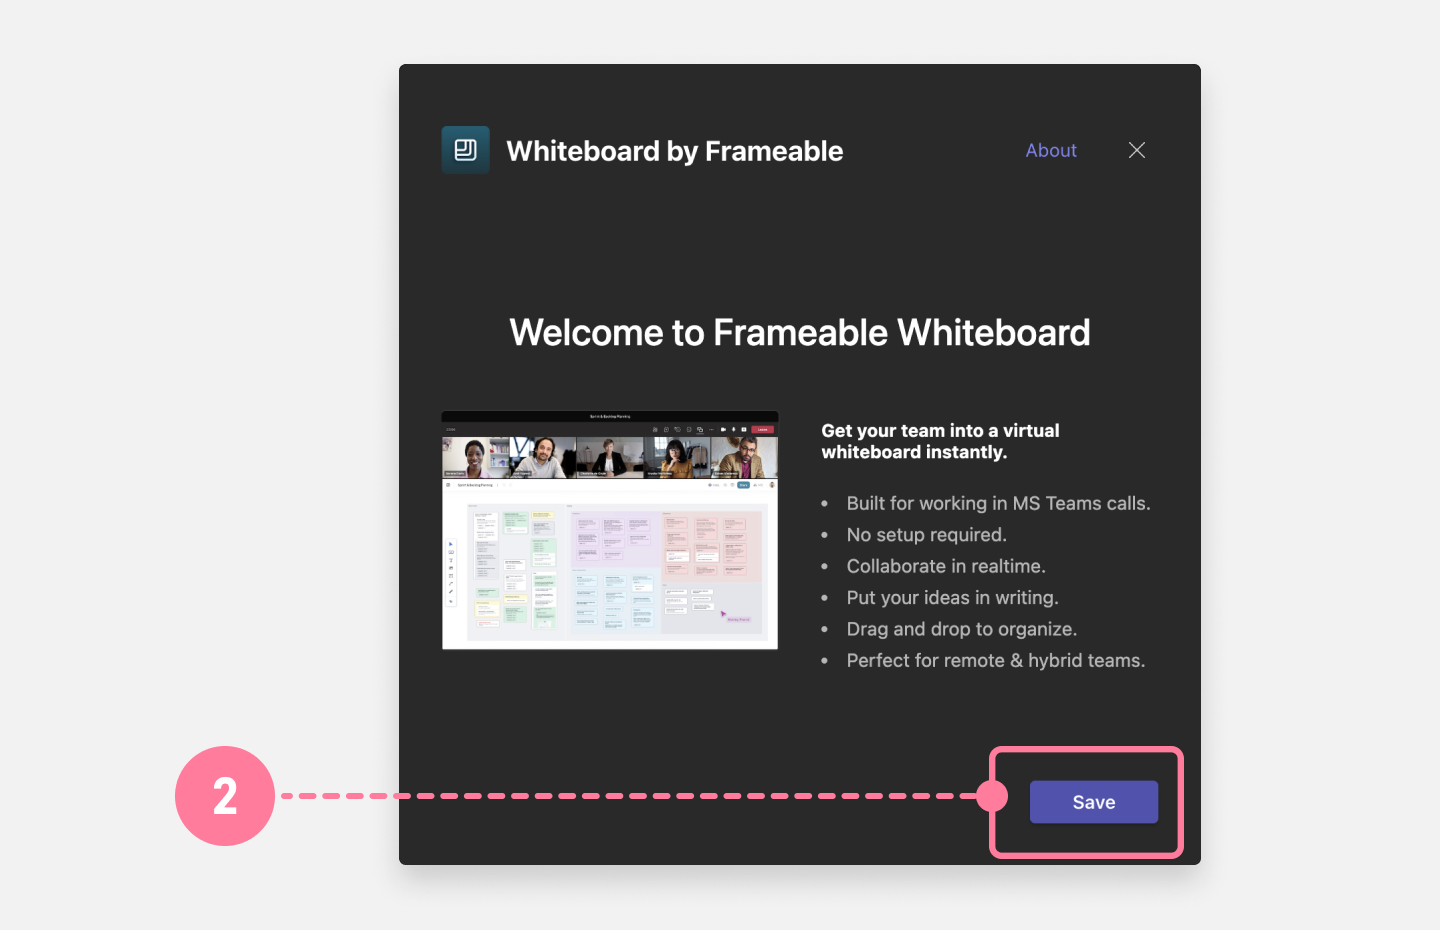
When the welcome modal appears, click “Save.” Once saved, a Whiteboard sidebar will open automatically.
The whiteboard sidebar will open automatically. The Whiteboard sidebar is where you will launch your Whiteboard from. Once you have launched your board, you can exit this sidebar. It can be accessed again at any time by clicking the Whiteboard icon at the top of the call window.
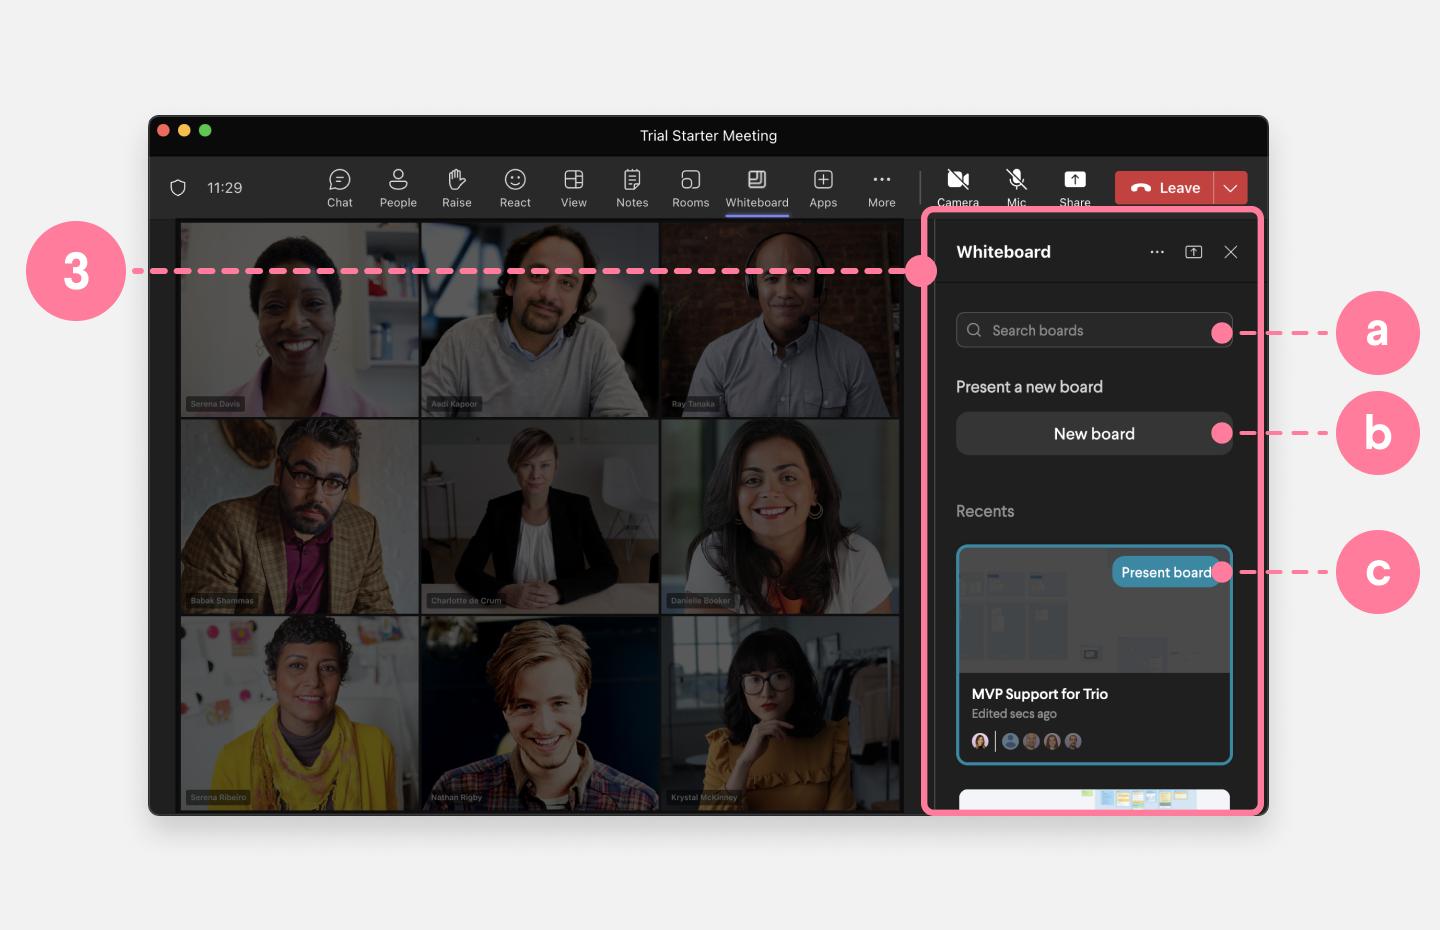
To start a new board, click the “New Board” button. This will display the Whiteboard in the call for everyone to see and is fully interactive for each meeting participant.
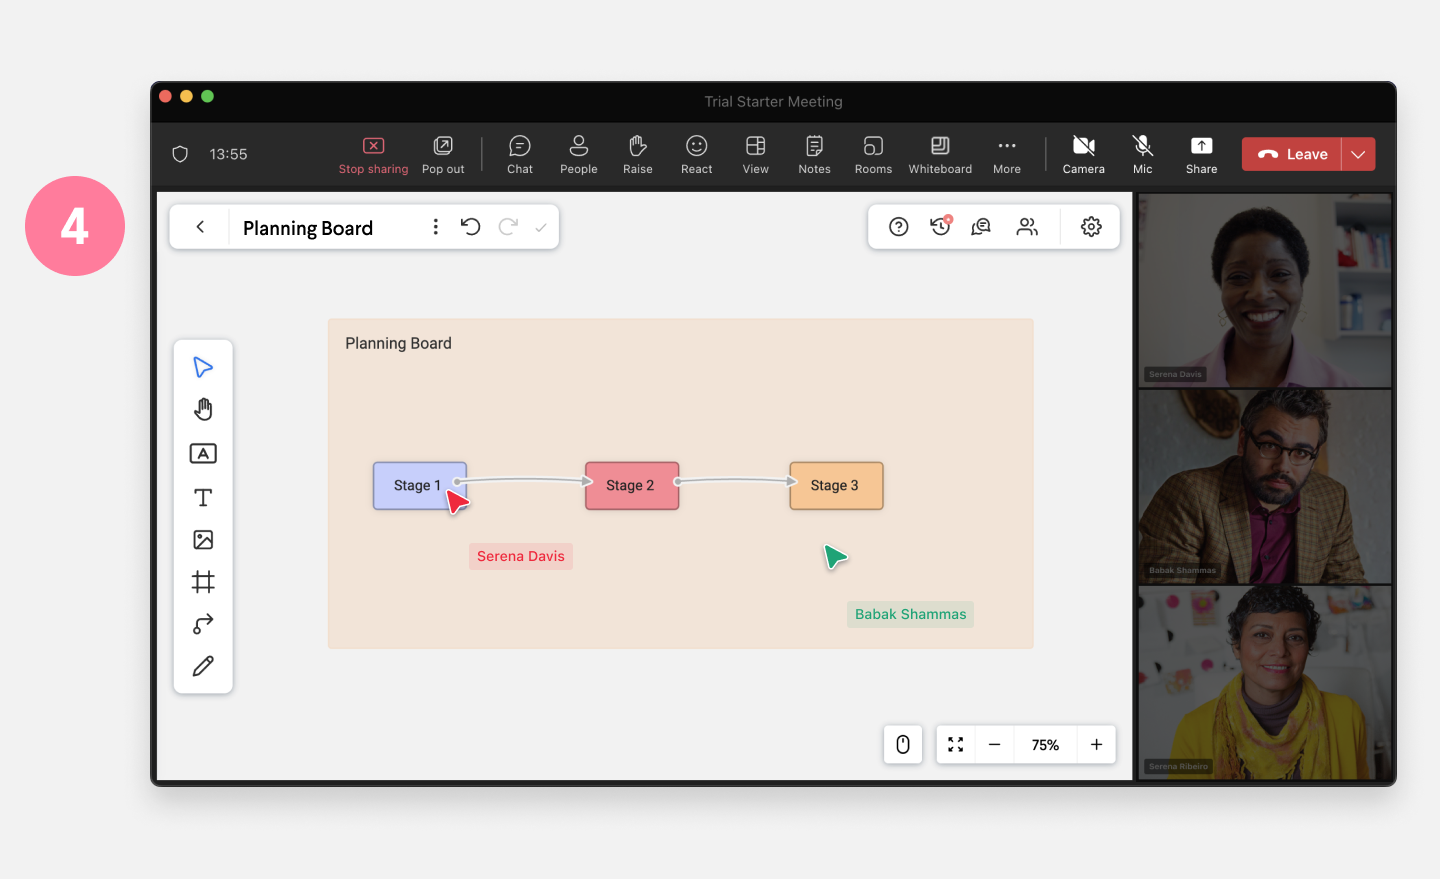
Once the new board is open, make sure to add a title by typing in the name field located in the upper left corner of the board. This board will be saved to your Whiteboard homepage and will be accessible there following the meeting. The board will also be accessible through a link automatically posted to the meeting chat.
Apply a Template to a New Call
A blank board can be a bit intimidating! If you find yourself at a loss for how to start mapping, using one of Frameable’s preloaded templates might be a good option to get things rolling. You can apply a template from your Whiteboard homepage or from within a board if starting in a call.
From the Whiteboard homepage: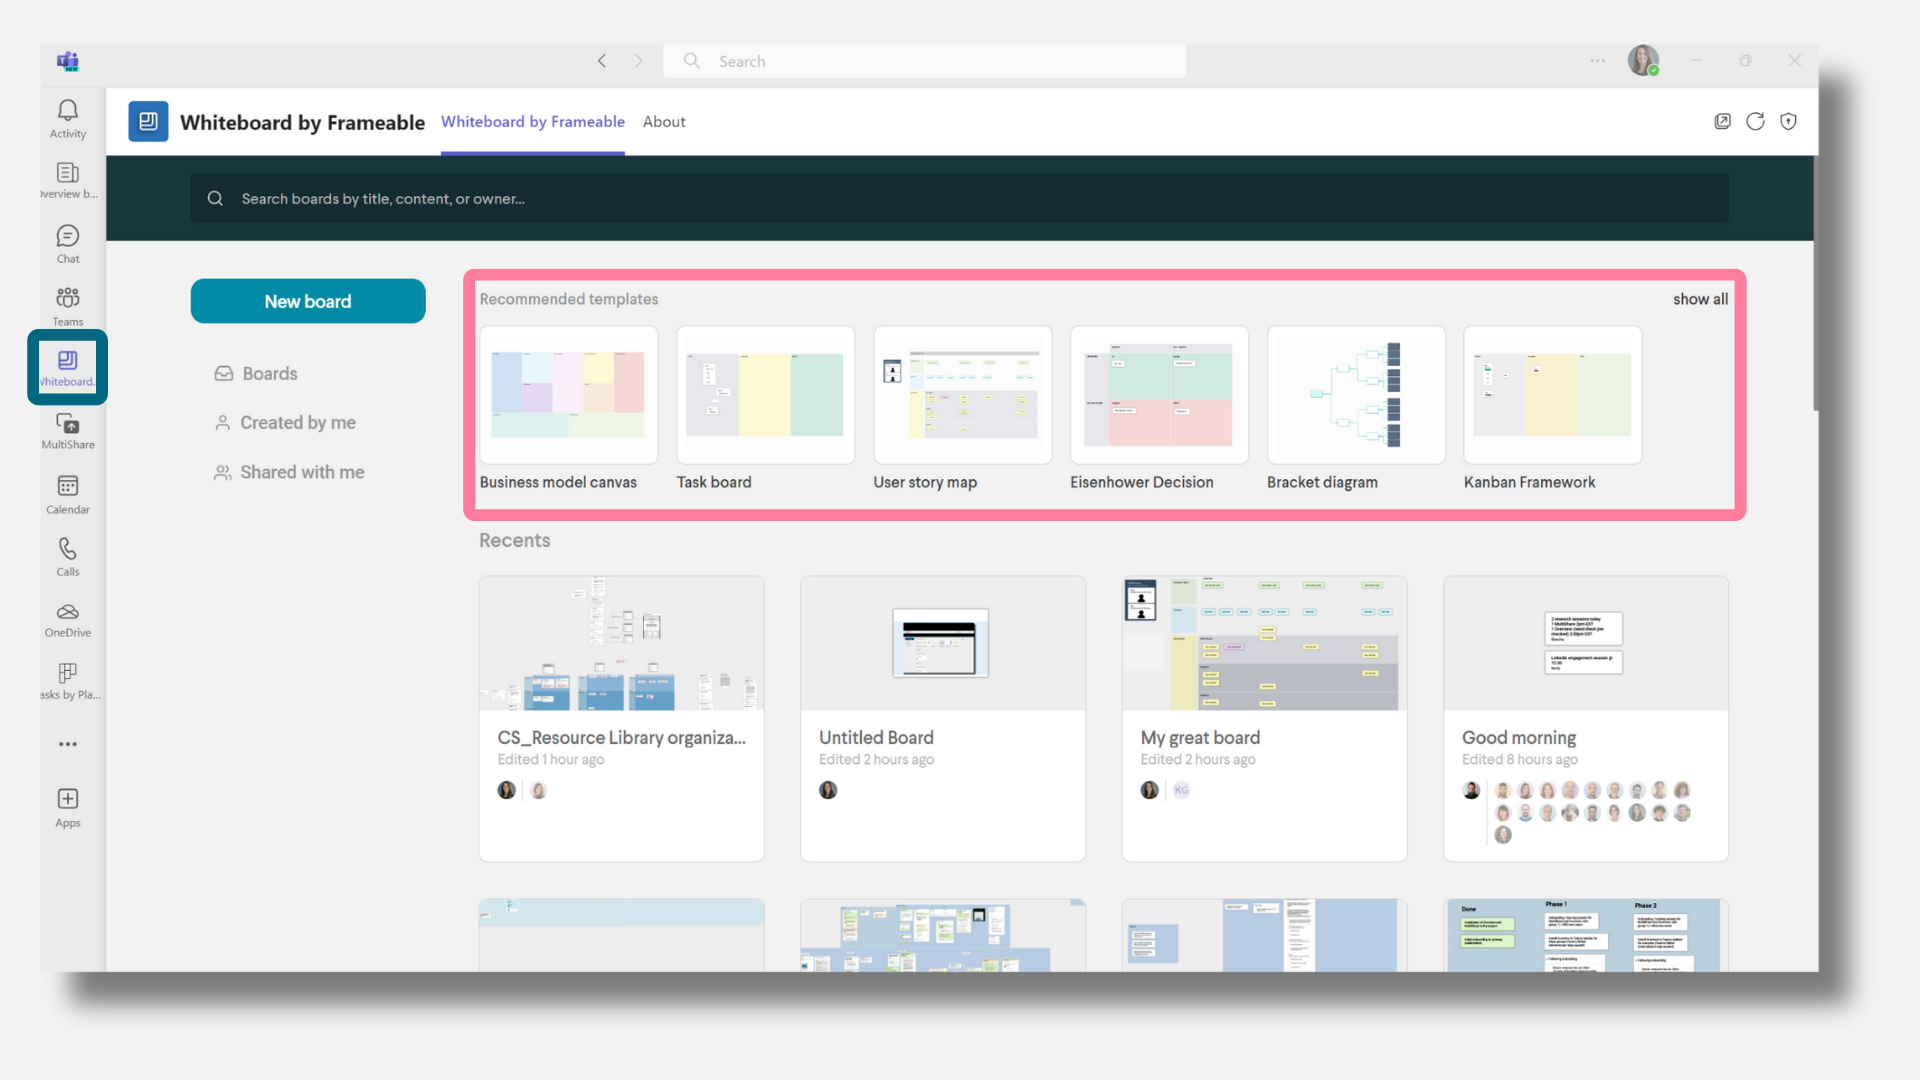
From within a board during a call: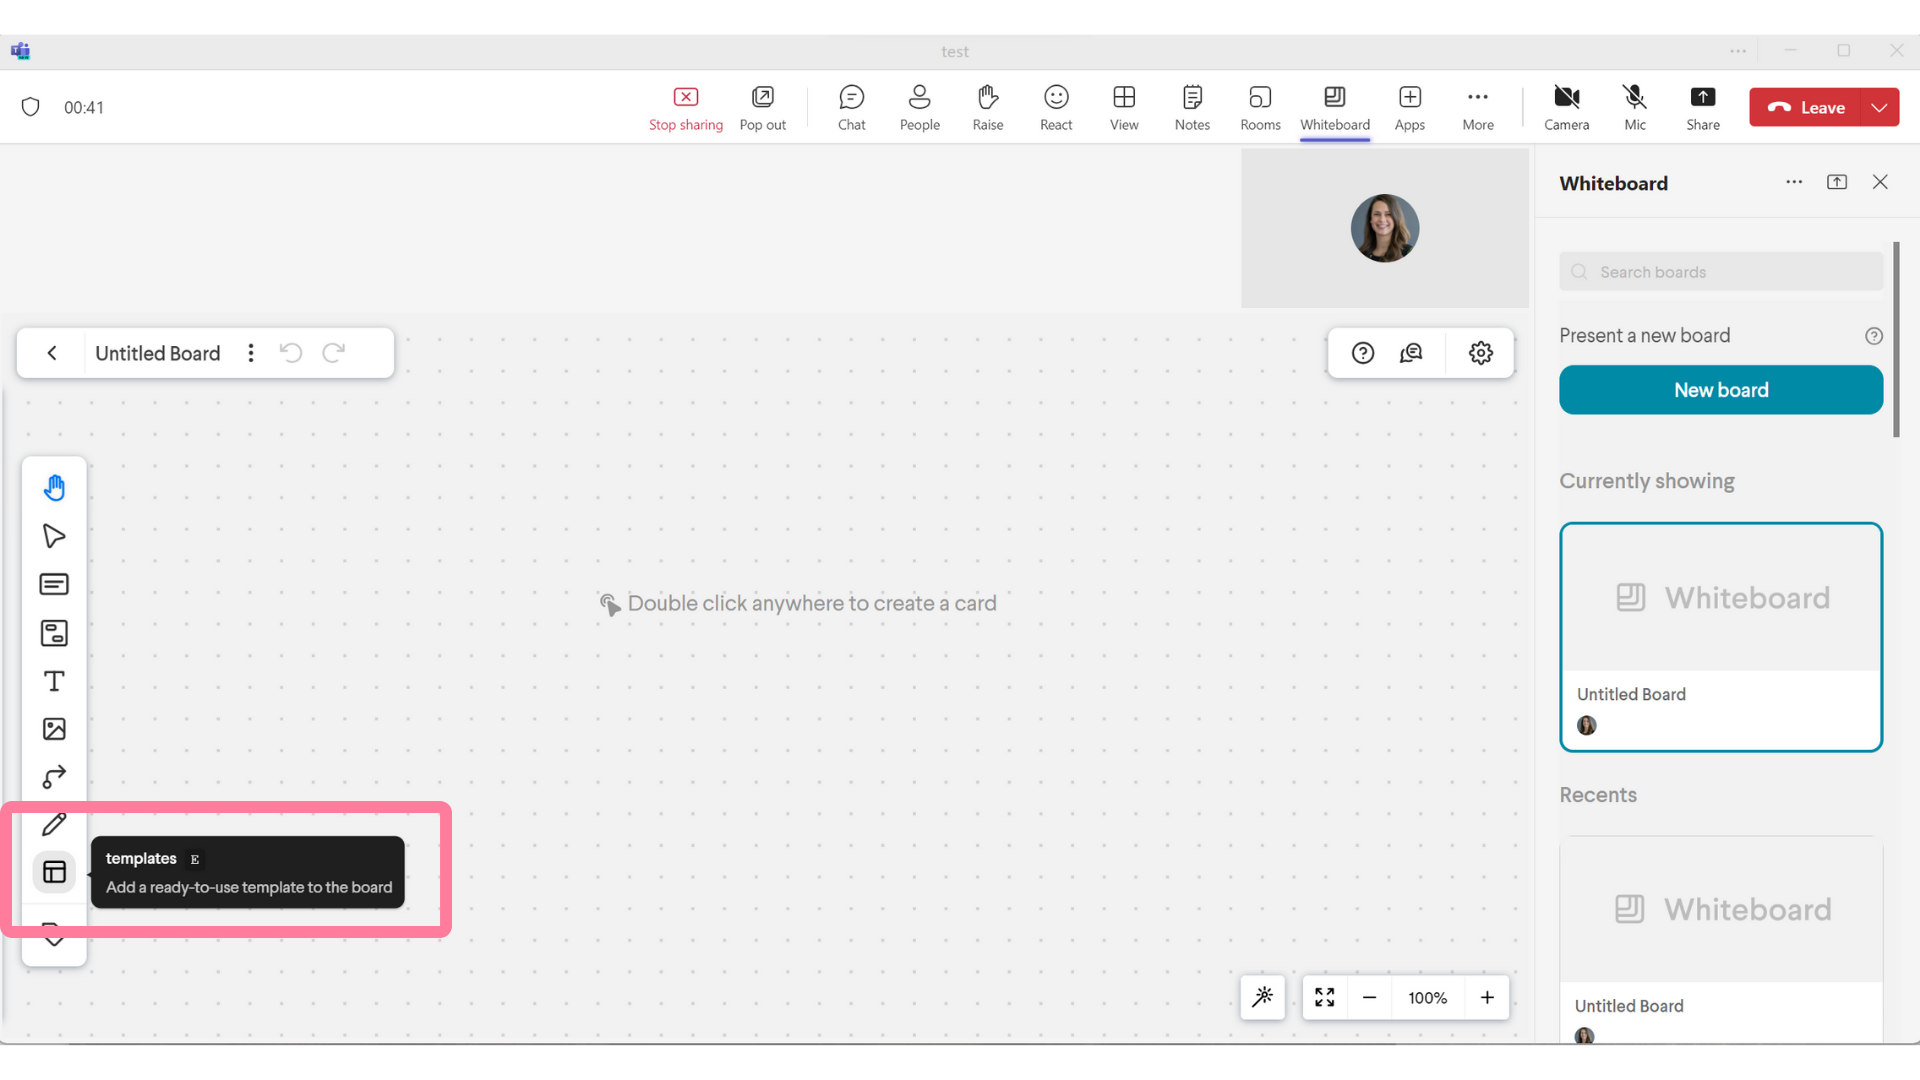

Navigating the Whiteboard Interface
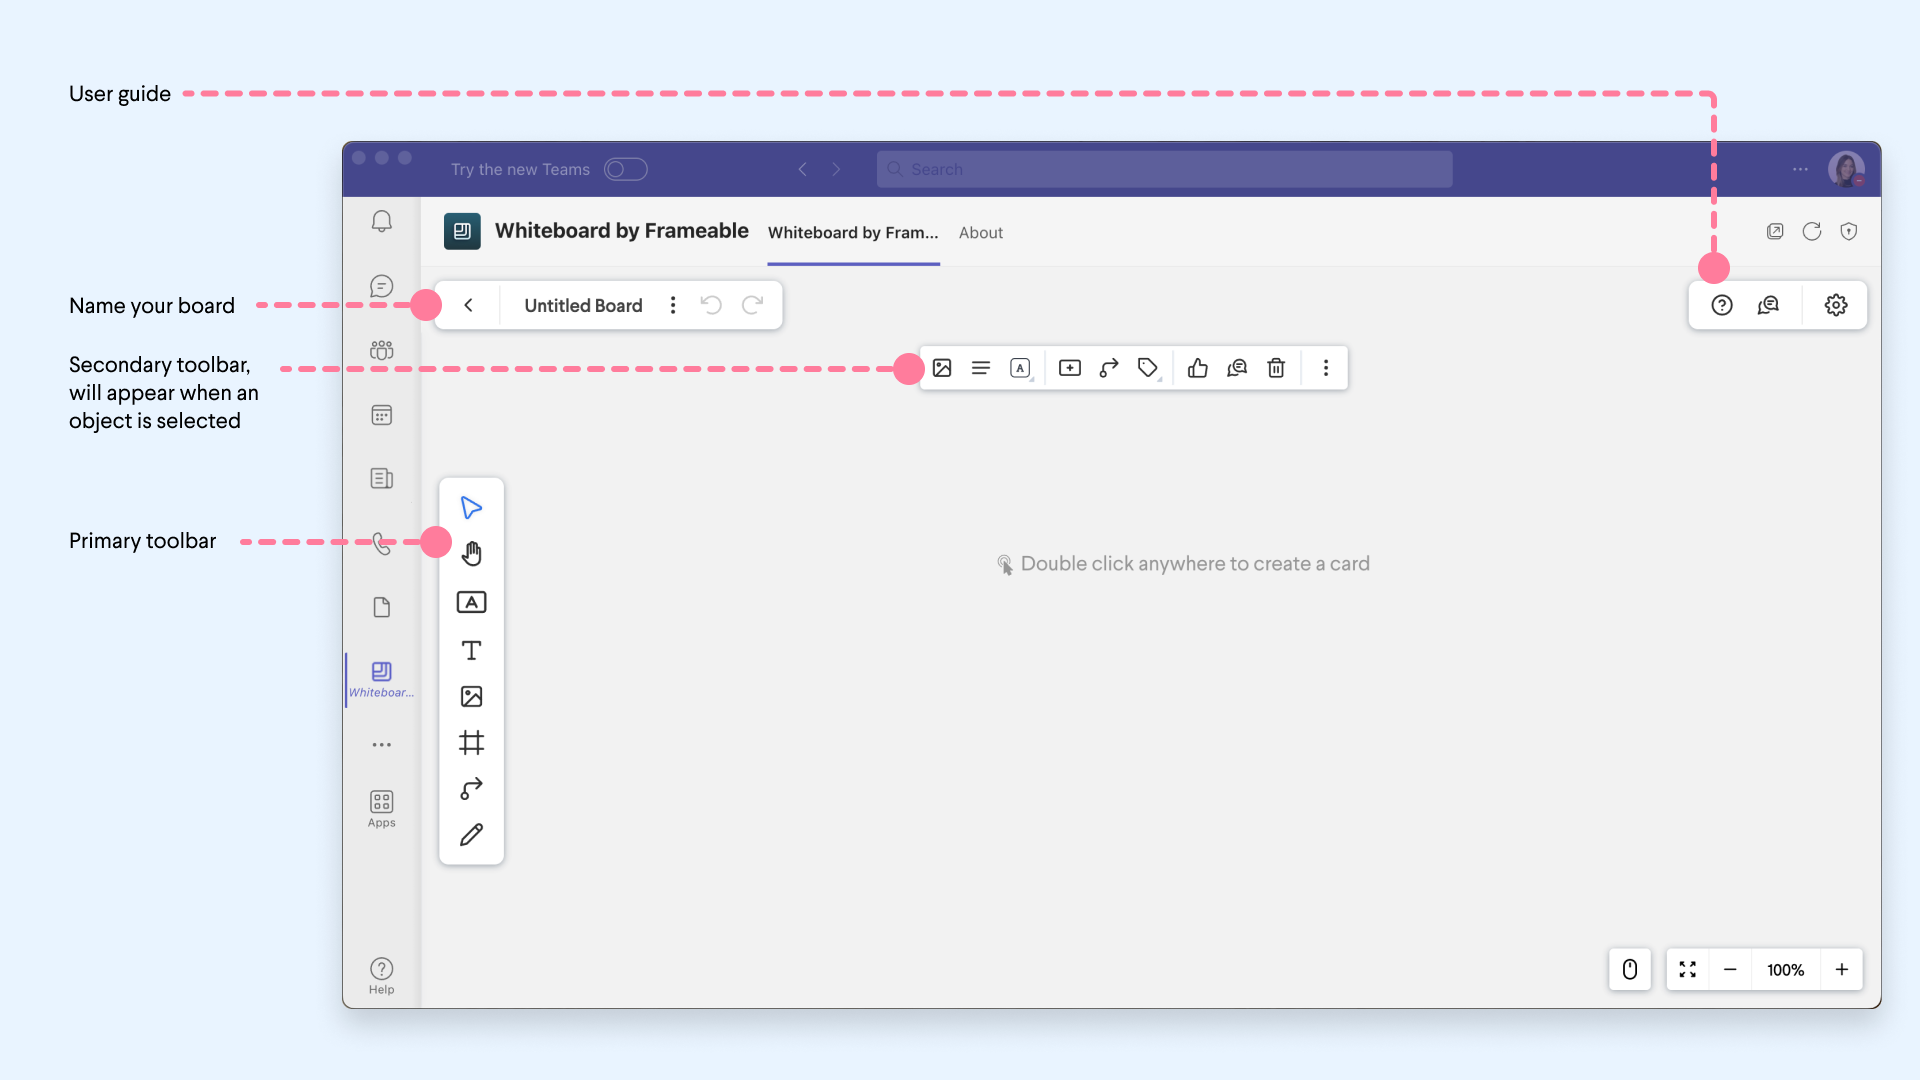
- The title bar contains important file details and navigation options such as the board’s title field, quick action buttons for back to homepage, undo/redo last edits, and an action menu for opening, sharing, saving, exporting, and deleting.
- The primary toolbar- displays all of your Whiteboard tools. Click to select a tool, then click anywhere on the board to apply it.
- Secondary toolbar - for some of the tools, a secondary toolbar will appear at the top of the board to give you additional options for customizing that tool’s action.
- Movement and display options - Choose whether to control your movement around the board via mouse or keyboard commands, quickly center your view of the board, and choose what percentage of zoom to apply to your view of the board.
- In-app user guide gives definitions and helpful tips on how to use the tools available within Whiteboard. It also contains a glossary of keyboard shortcuts to make your boarding experience faster and easier.
- Comments - Clicking here will open a side panel to display all comments made by all collaborators to this board.
- Settings- gives even more display and customization options for your Whiteboard experience. Here you can adjust things like board color, turning spellcheck on or off, and choose options for zooming and panning according to your preference.
The Whiteboard Toolbars
Whiteboard’s tools are organized on the primary toolbar.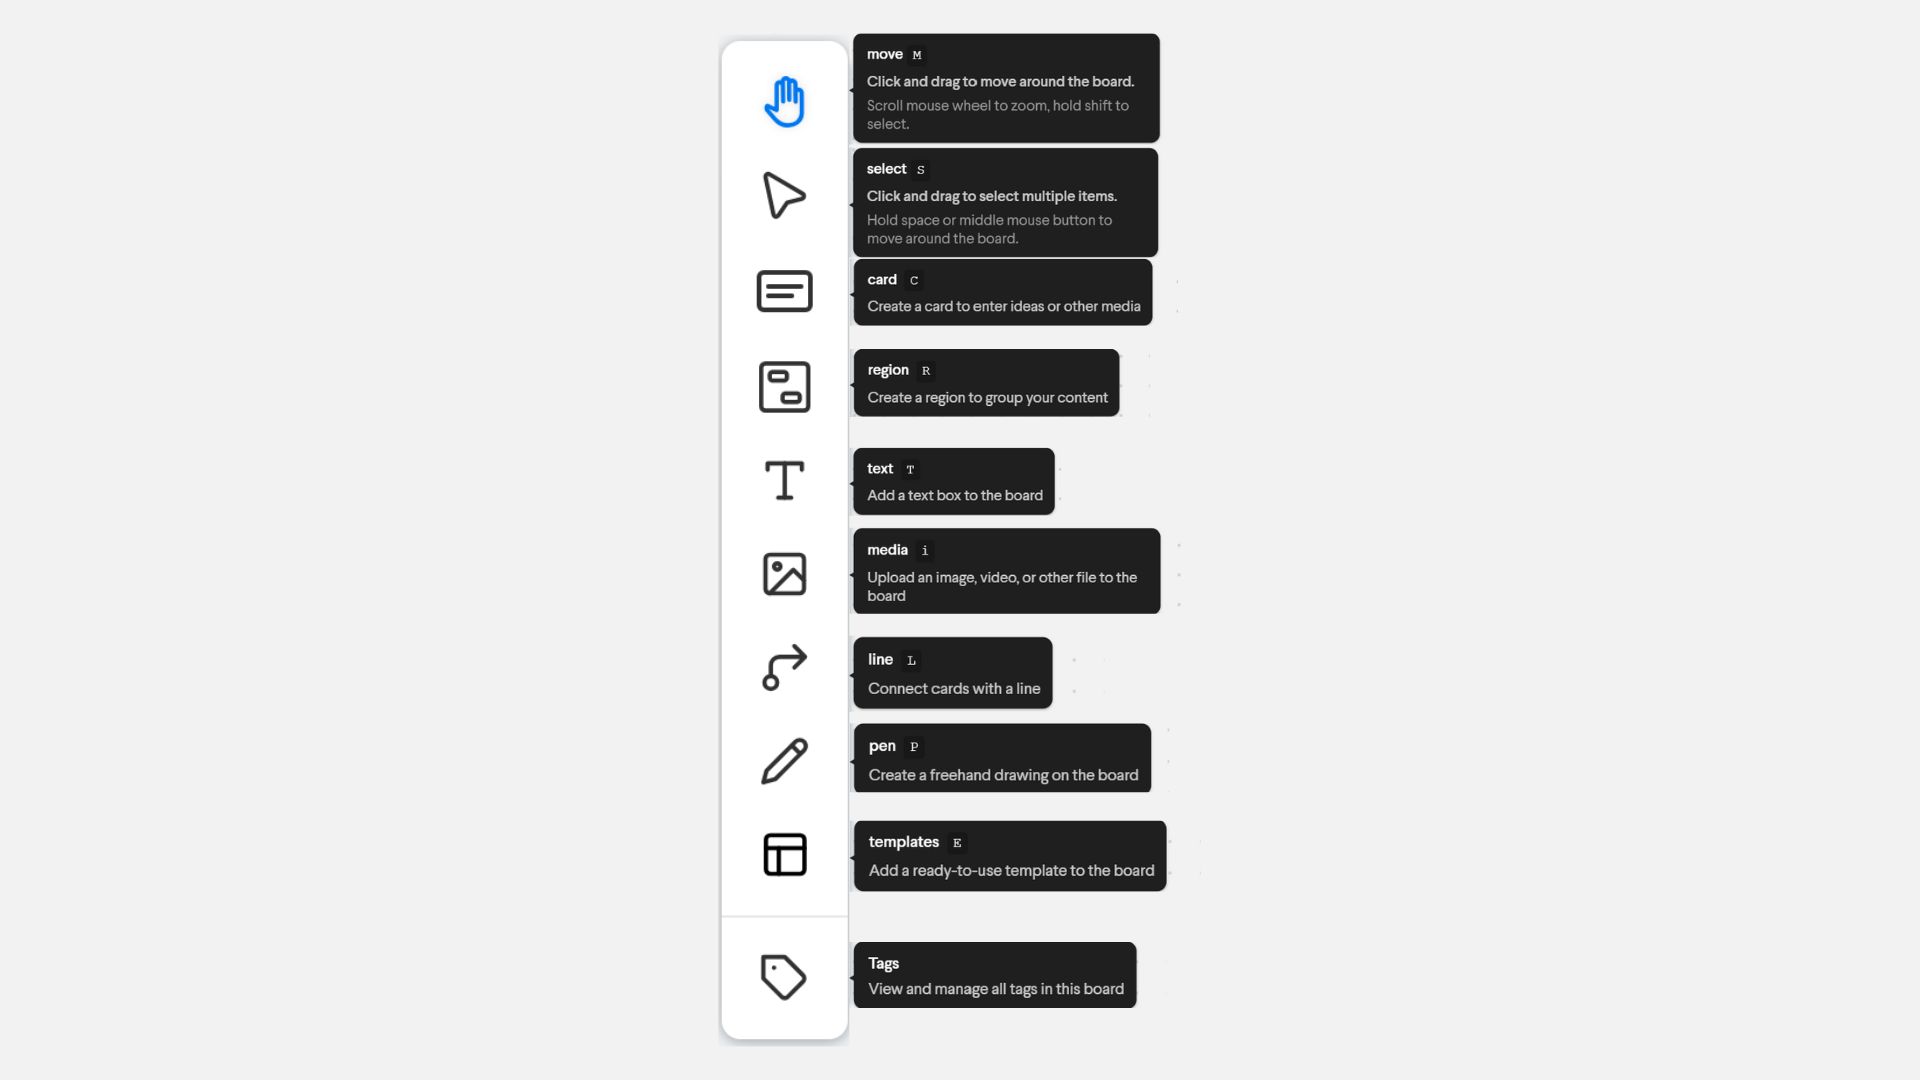
Some of those tools have additional customization options that are displayed via a secondary toolbar once the tool has been selected.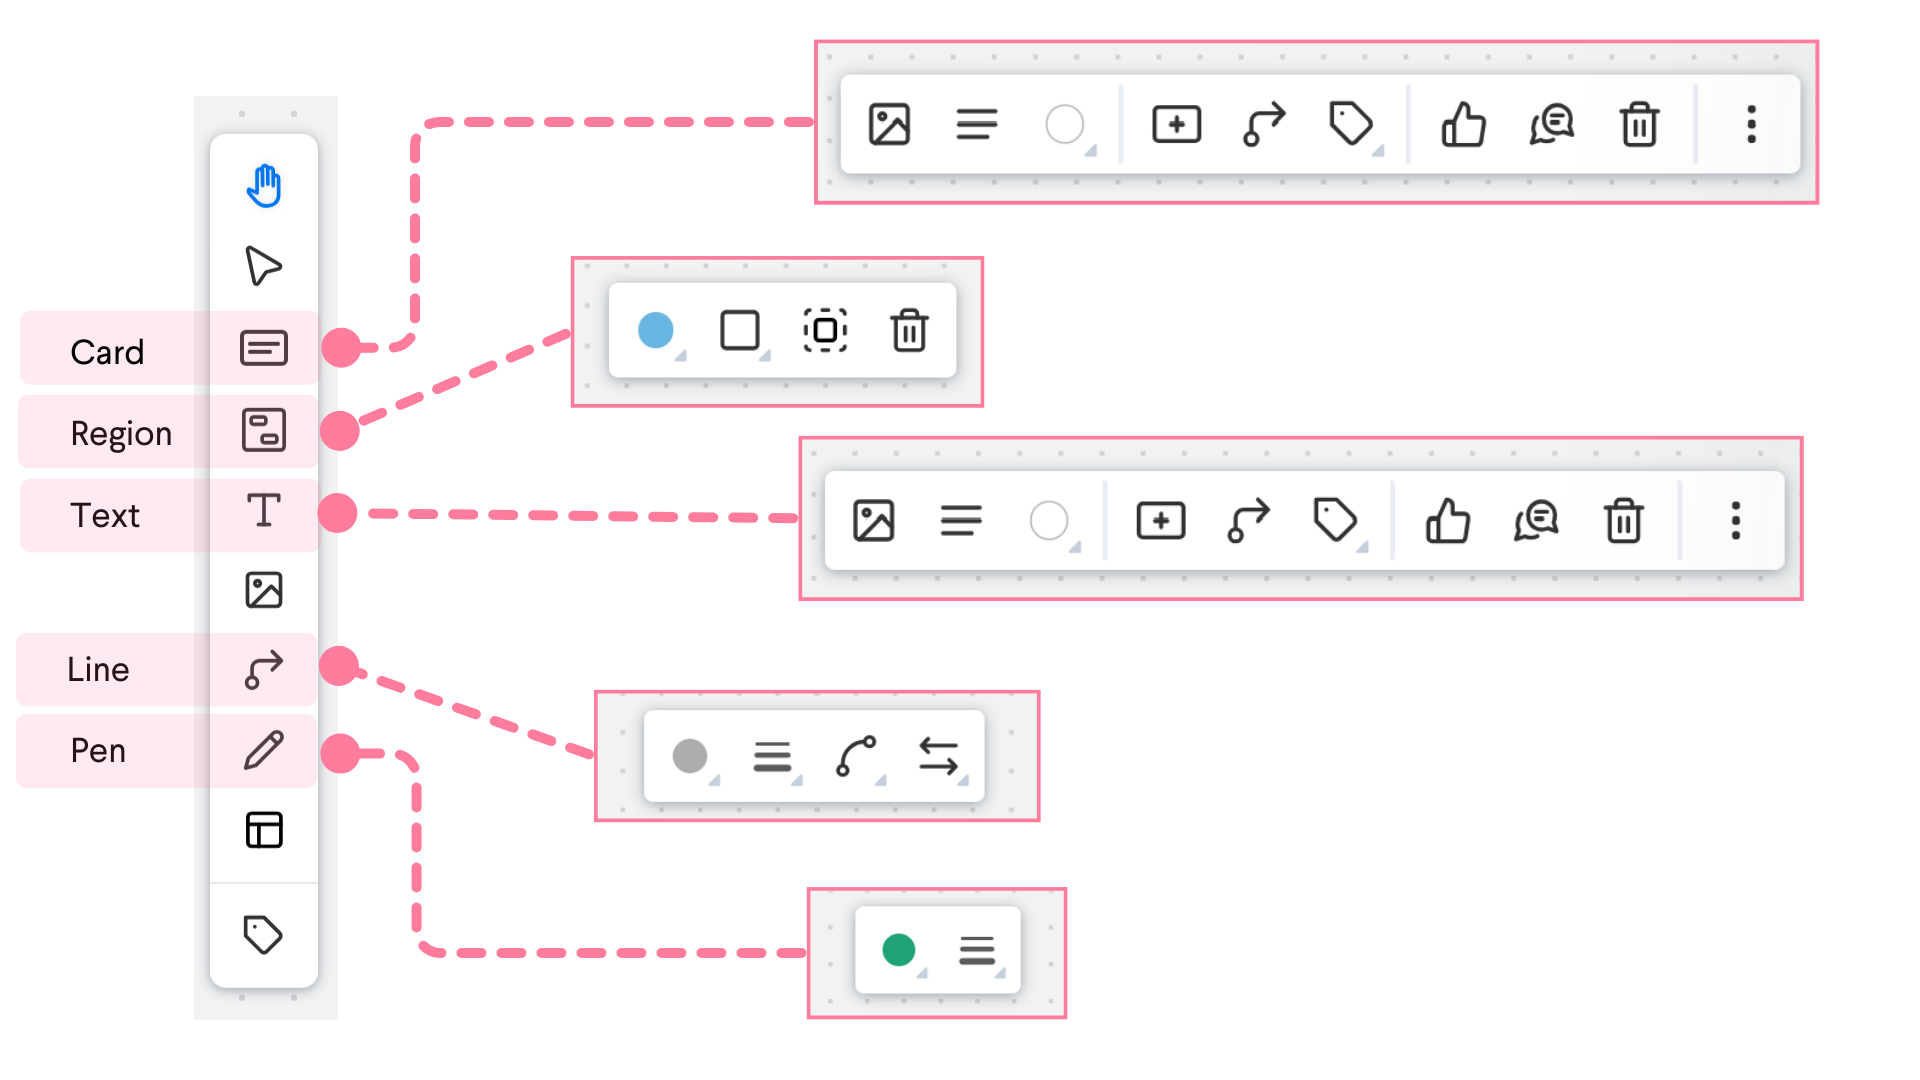
The Whiteboard Toolbox:
Move

Choose the Move tool in the toolbar or hold down your space bar while clicking and dragging to move around the board. Zoom in or out with your mouse wheel or pinch to zoom on a touchscreen or trackpad.
Select

The select tool allows you to click and drag to highlight select several items at one time on a Whiteboard. You can easily access Move functionality when the Select tool is engaged by pressing the spacebar while clicking and dragging to move around the board.
Cards
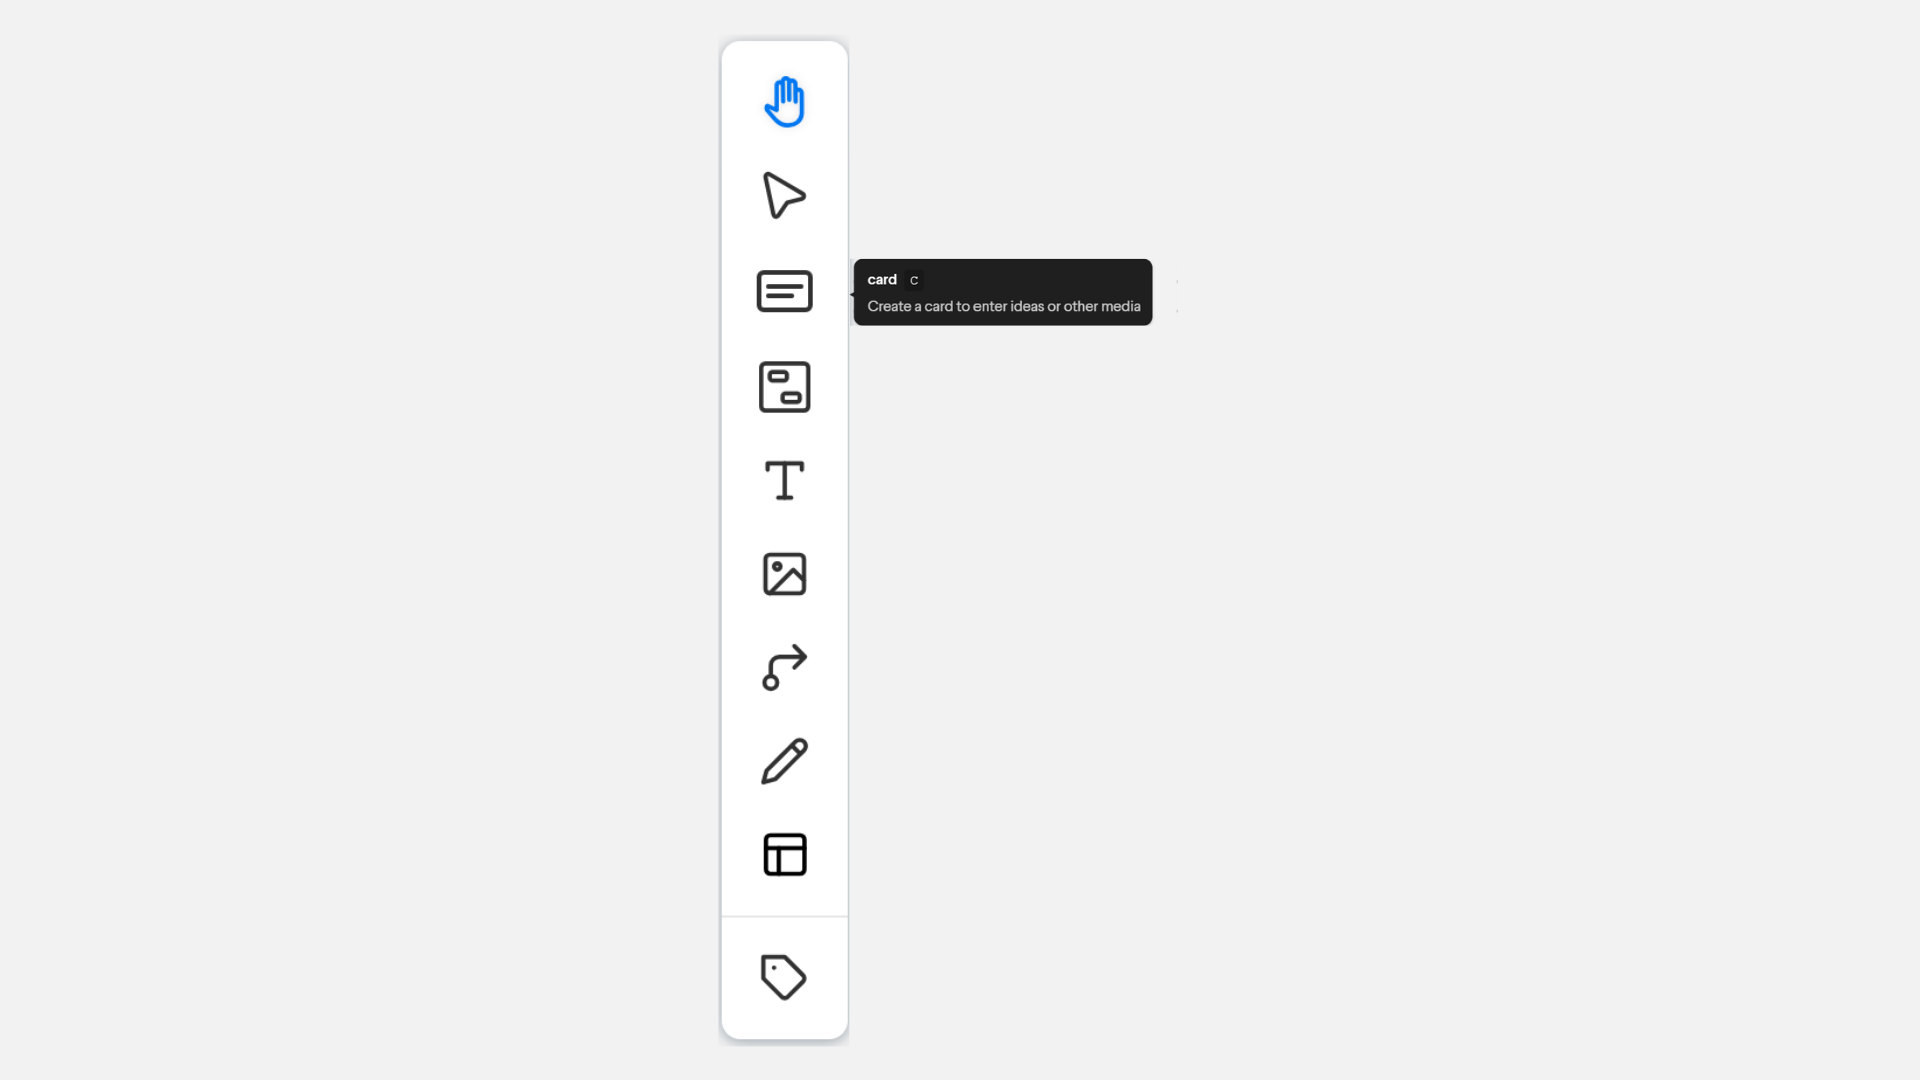
A card is the basic unit. It can represent anything - a person, place, object, or any idea at all.
You can create a card in two different ways: double-click on the board or select the card tool from the toolbar and then click on the board.
Nested Cards
When a card is selected, click Add a card, from the top tool menu to add a nested card. Or select a card and tap CMD+return on your keyboard.
After creating one nested card, tap return to continue adding nested cards.
Regions

Use regions to identify sections of the board. To create a region select the region tool in the left toolbar and click on the board. You can also right click on the board and select ‘create a region’ in the menu.
Text

Add plain text anywhere on the board by selecting the text tool in the toolbar and clicking on the whiteboard.
Media
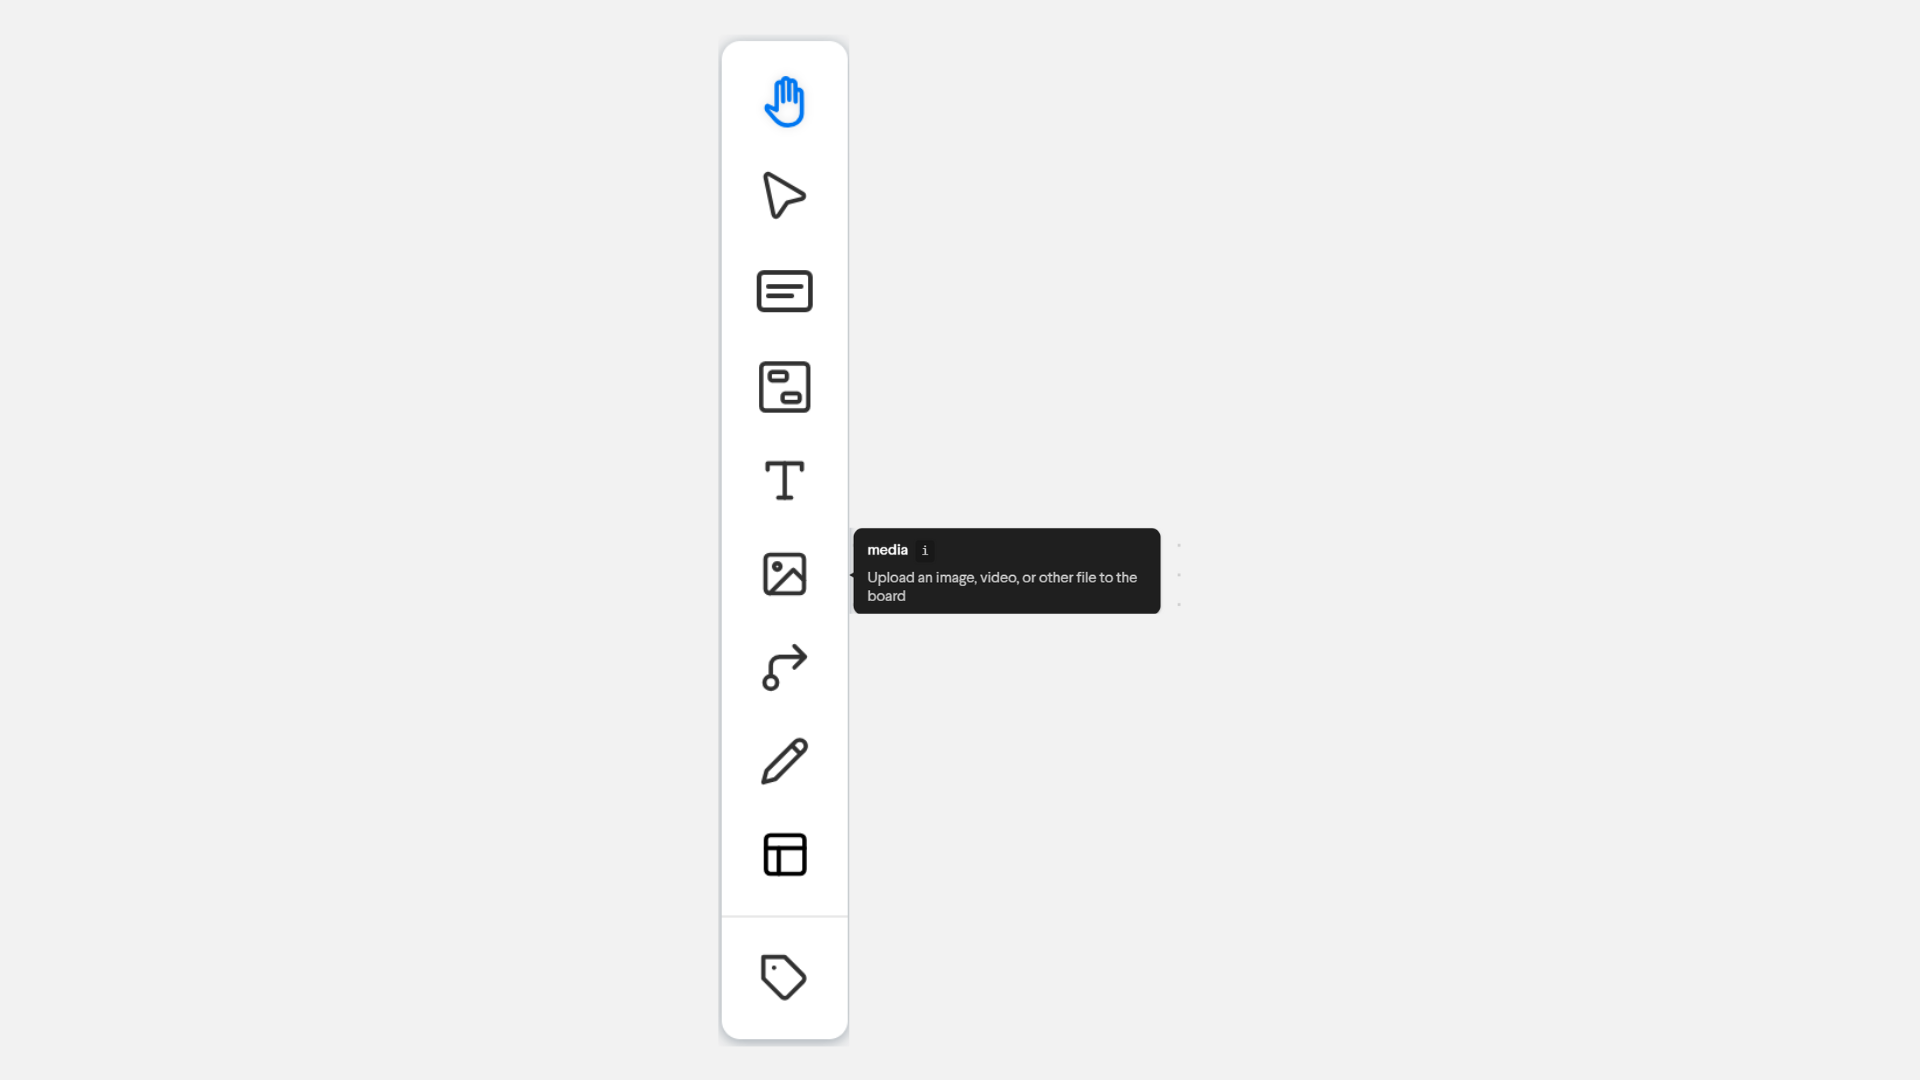
To add an image, GIF, file, or video to your card - drag and drop the file onto a card or open the card menu and select media.
If you’re using Whiteboard with Microsoft Teams, your files will be saved to your team's SharePoint library.
Lines
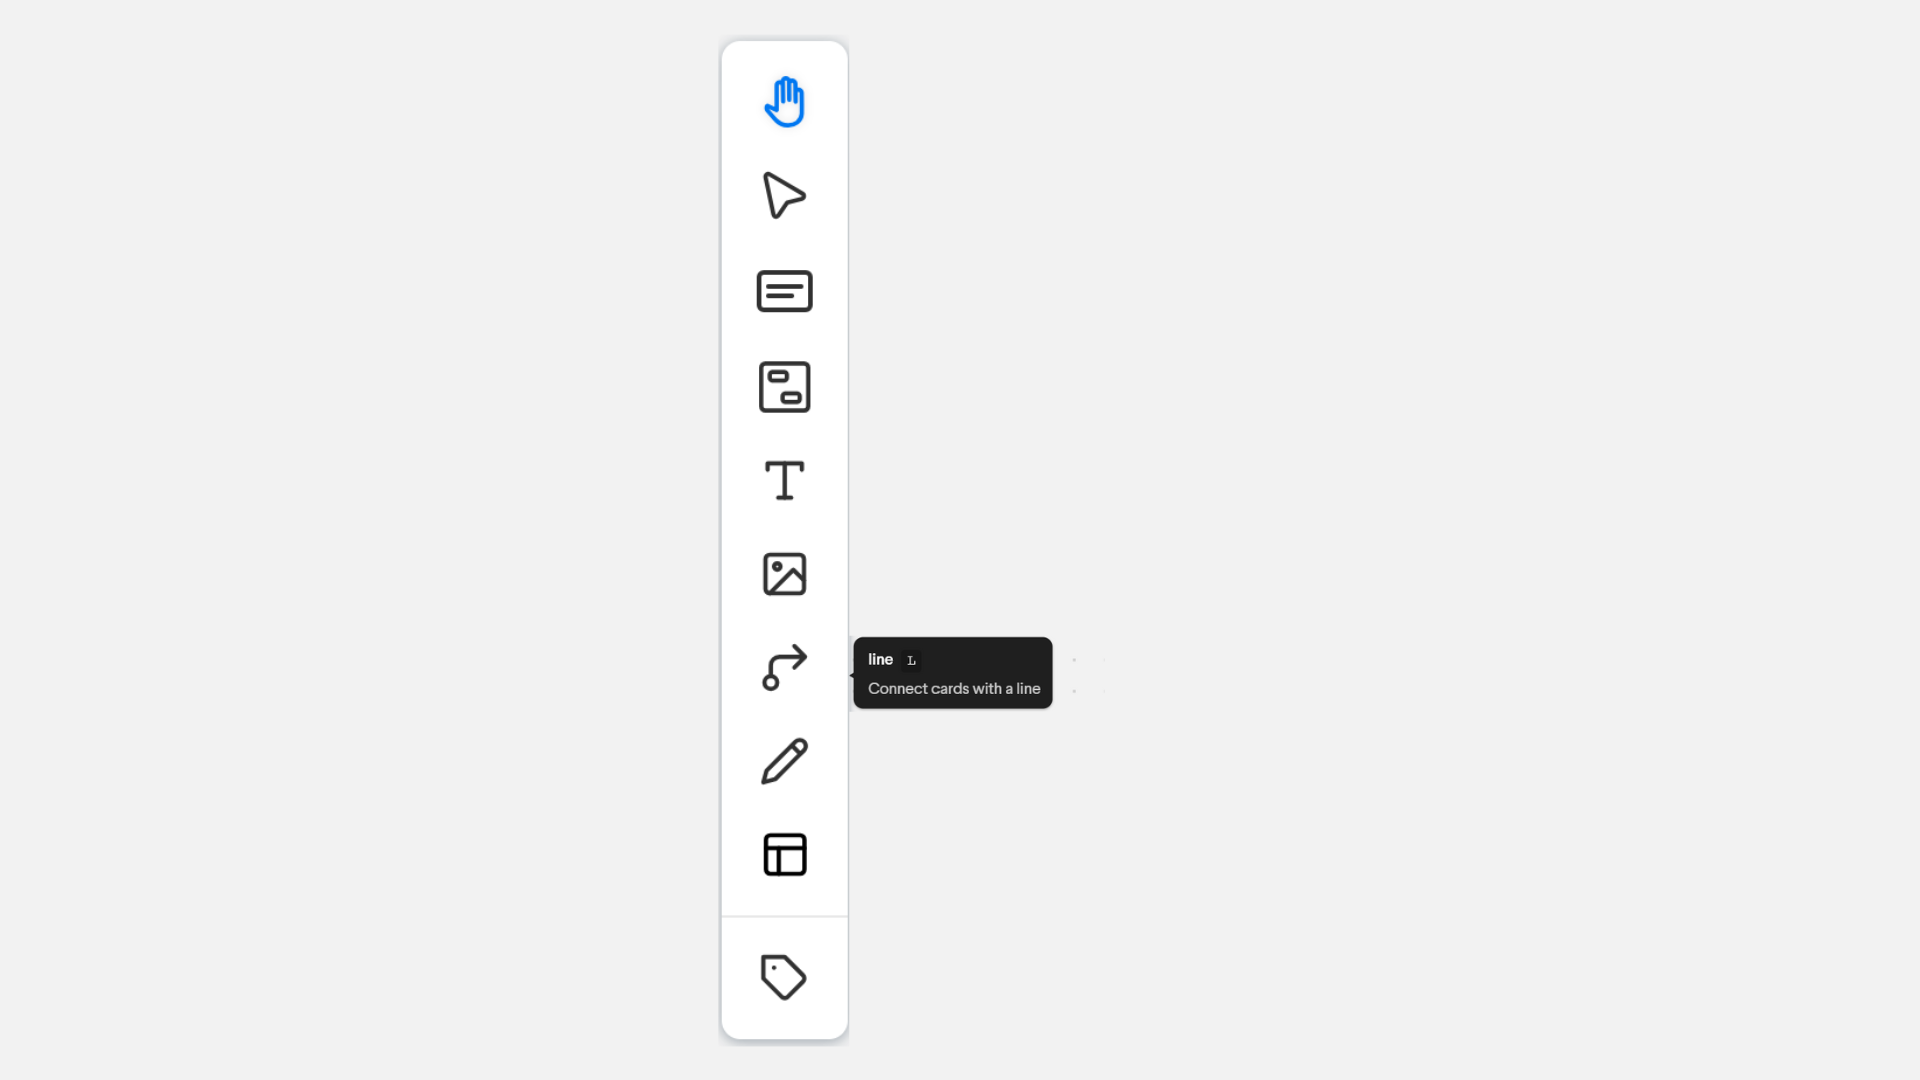
To create a line, select the line tool in the left toolbar and click on the board to create one endpoint, click a second time to complete the line. You can also begin drawing a line from a card by clicking the line tool in the above toolbar when a card is selected. Edit the line by selecting it and click on an endpoint and dragging it to a new location.
Change the line from an arc to an elbow by using the “Line type“ tool in the toolbar that appears at the top of your board when the line is selected.
Pen Tool

Choose the pen tool in the toolbar to draw freely on the whiteboard. You can change the color, opacity, line style, and thickness via the toolbar at the top of the screen.
Templates
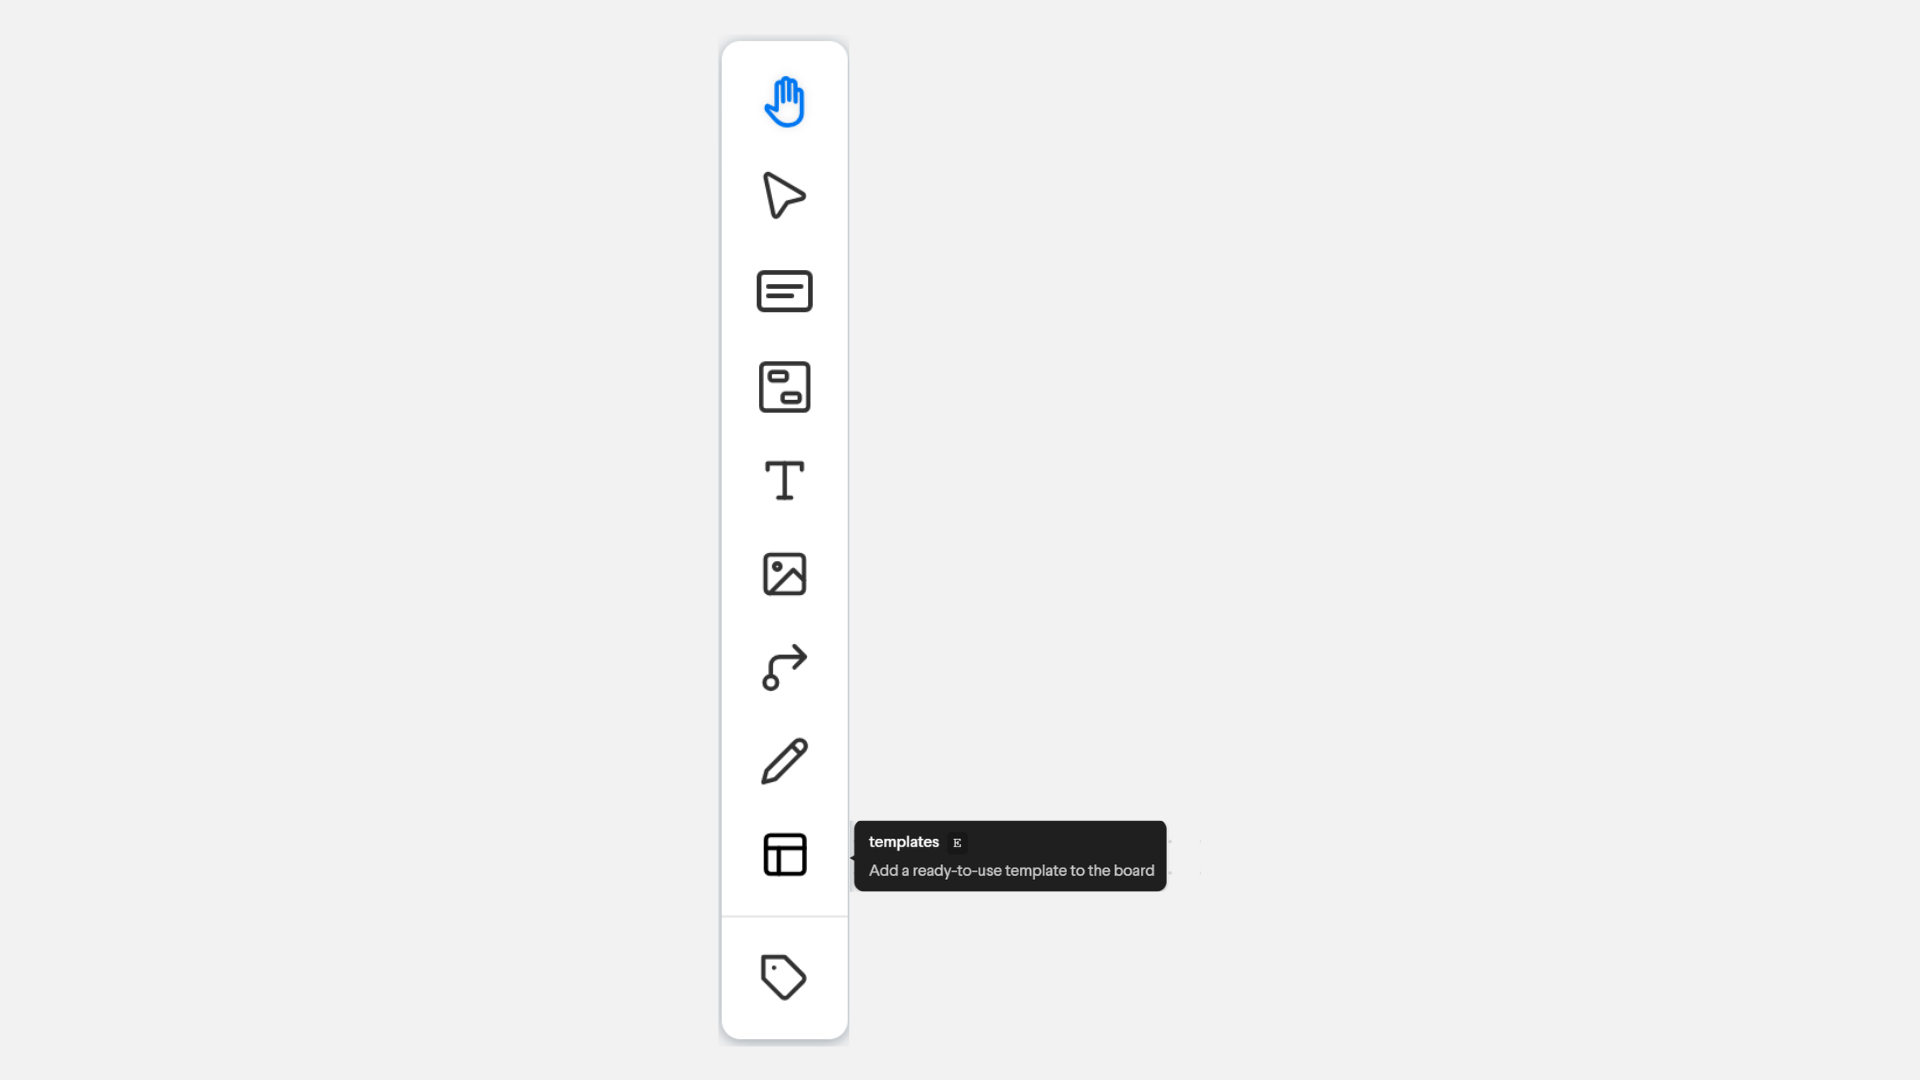
Choose the template tool to open a modal with a selection of premade templates. Select the template you would like to apply to your map and click ‘use template.’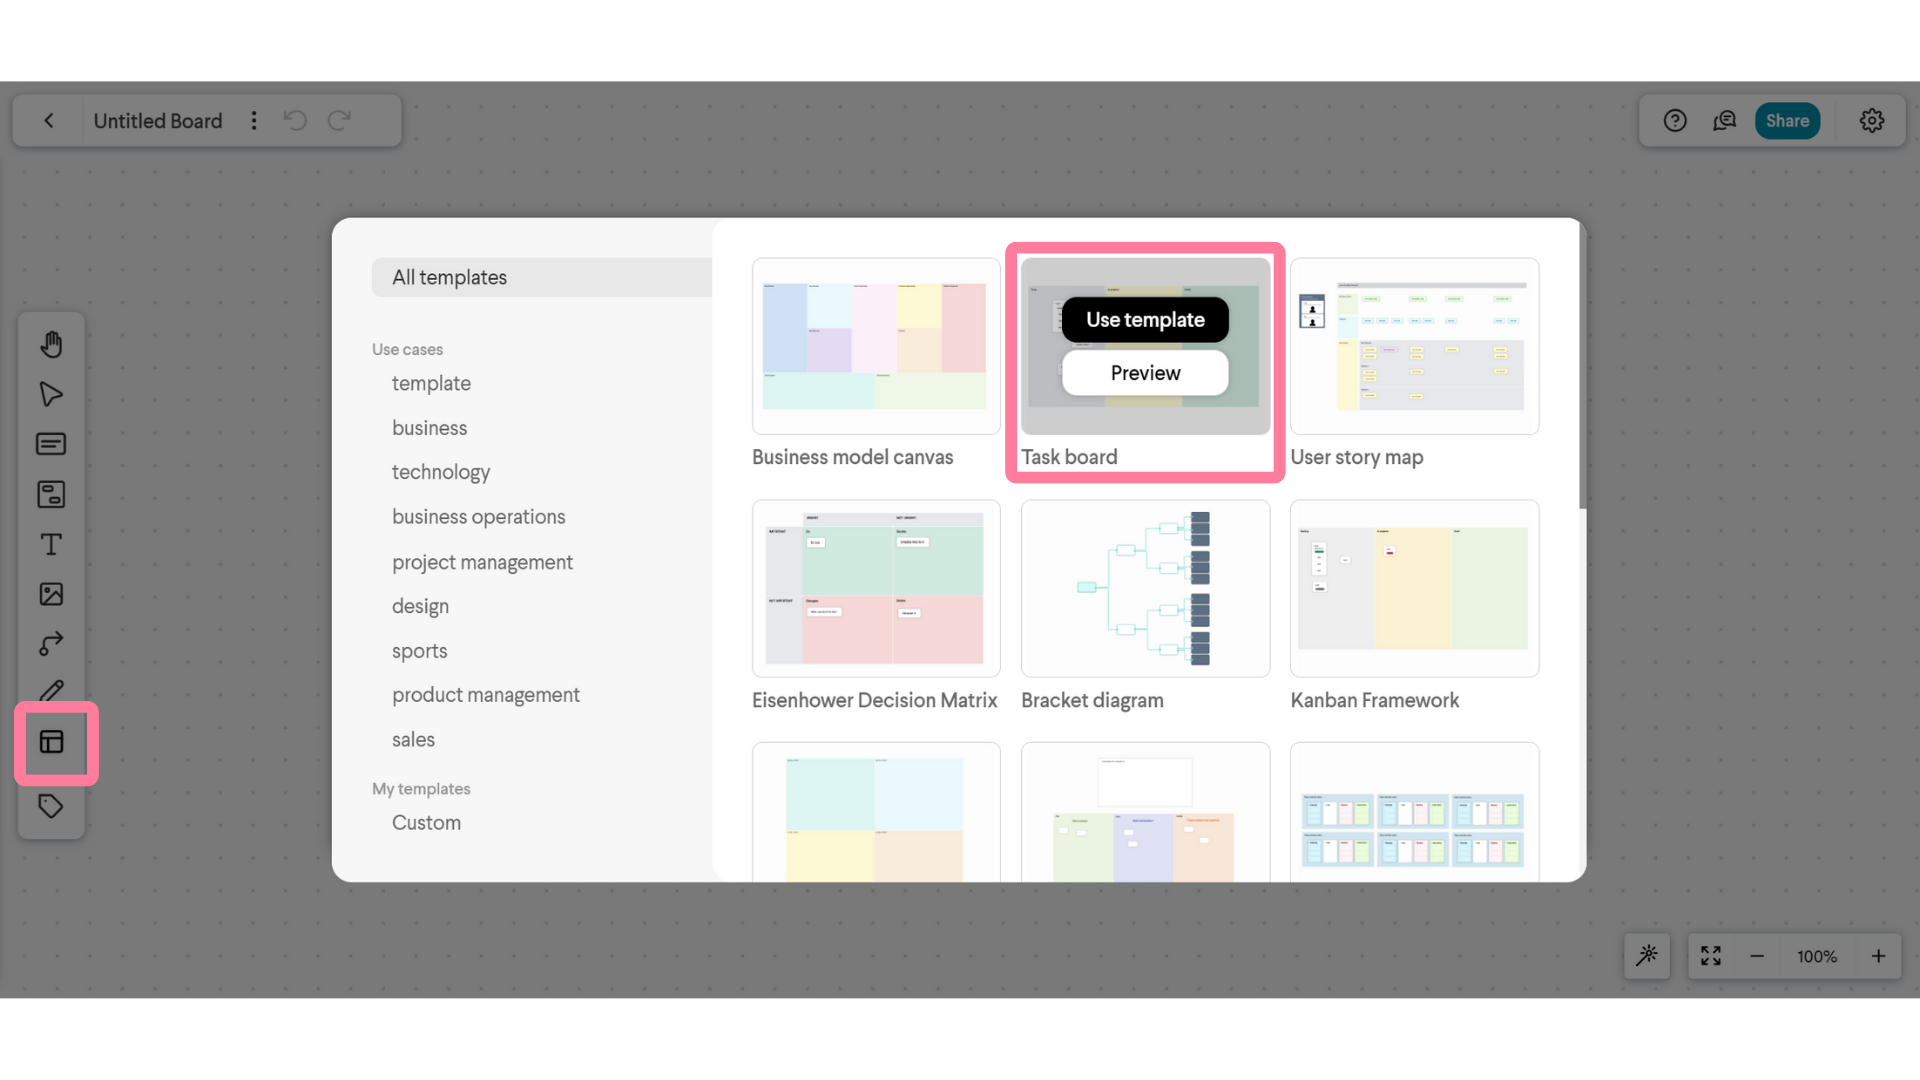
Tags
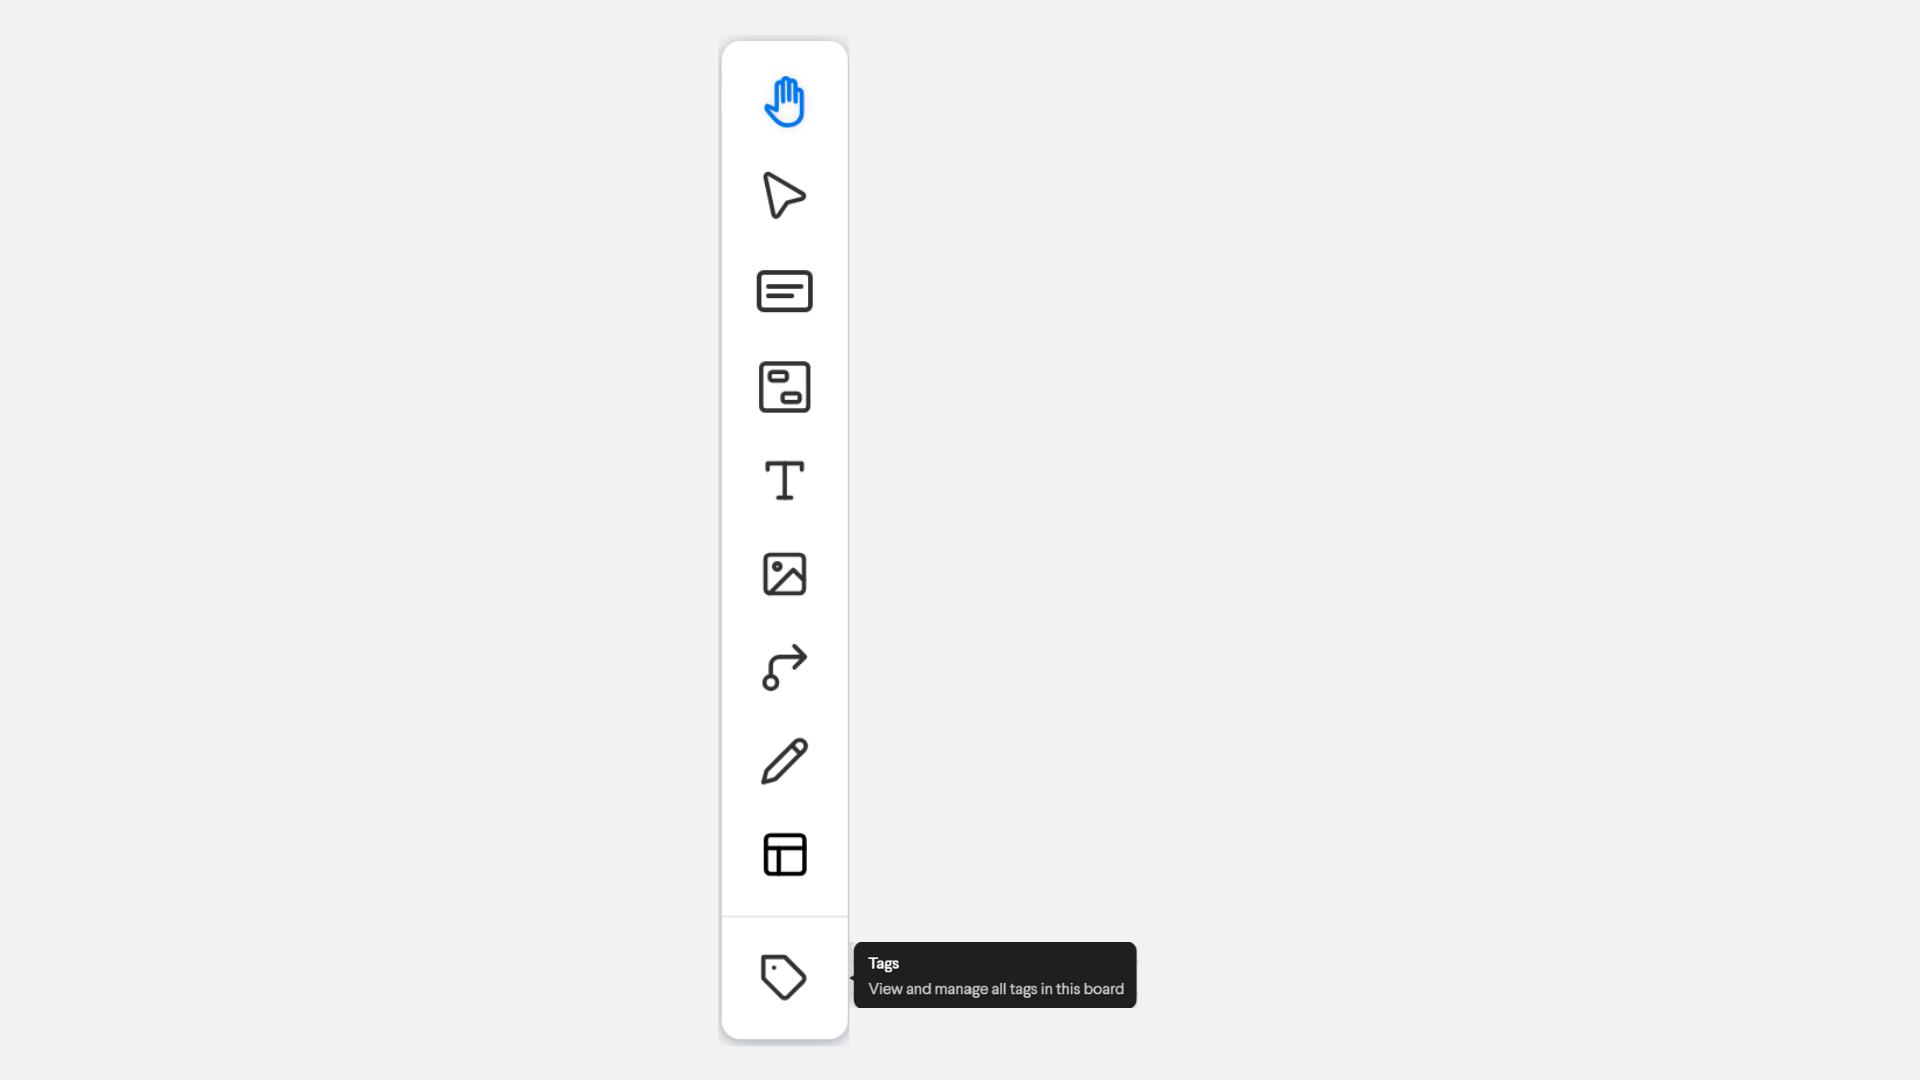
Tags are used to add filterable categories and details to your cards. Add tags to cards by visiting the card's secondary menu or right-clicking on a card and selecting ‘add tags.’ Type in the tag title you want to create, select the color of the tag, and click ‘add’ to apply it to the card.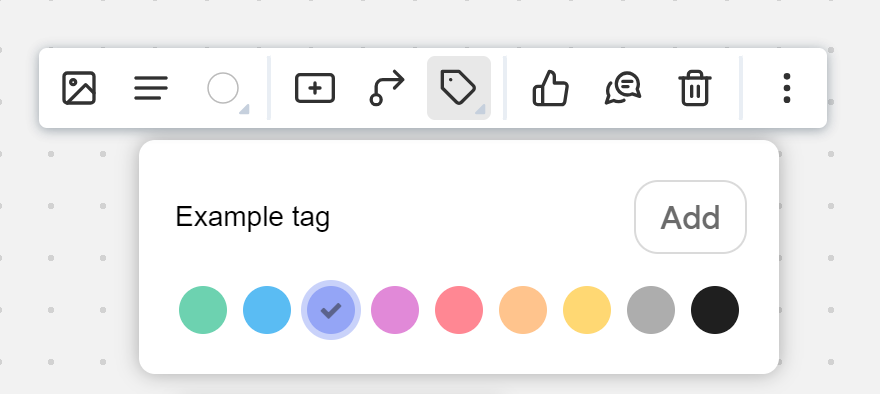
You will see the tag appear on the bottom of the card and also in the tags sidebar.
Filter tags
Once you have applied a number of tags and there is a good amount of detail on your board, it may be helpful to isolate a particular tag to see where information labeled with that tag might be found on the board.
To filter tags:
- Open the tags sidebar by clicking on the Tags tool on the primary toolbar.
- Select the tag you wish to filter by.
When you make your selection, you will notice that all items on the board that do not have that tag applied appear faded and blurred. The tag you are filtering by will stand out in focus, allowing you to quickly scan the board for the information you are looking for.
To stop the filter, click on the tag a second time in the tags sidebar to deselect it or simply close the tags sidebar.
Whiteboard Access and Sharing
When you look at your Whiteboard homepage, you will see a variety of boards sorted into sections of boards that have been started by you or shared with you. You can share boards with collaborators, set boards to be viewable to anyone with the link, or keep a board private by adjusting its individual settings.
Inviting Collaborators
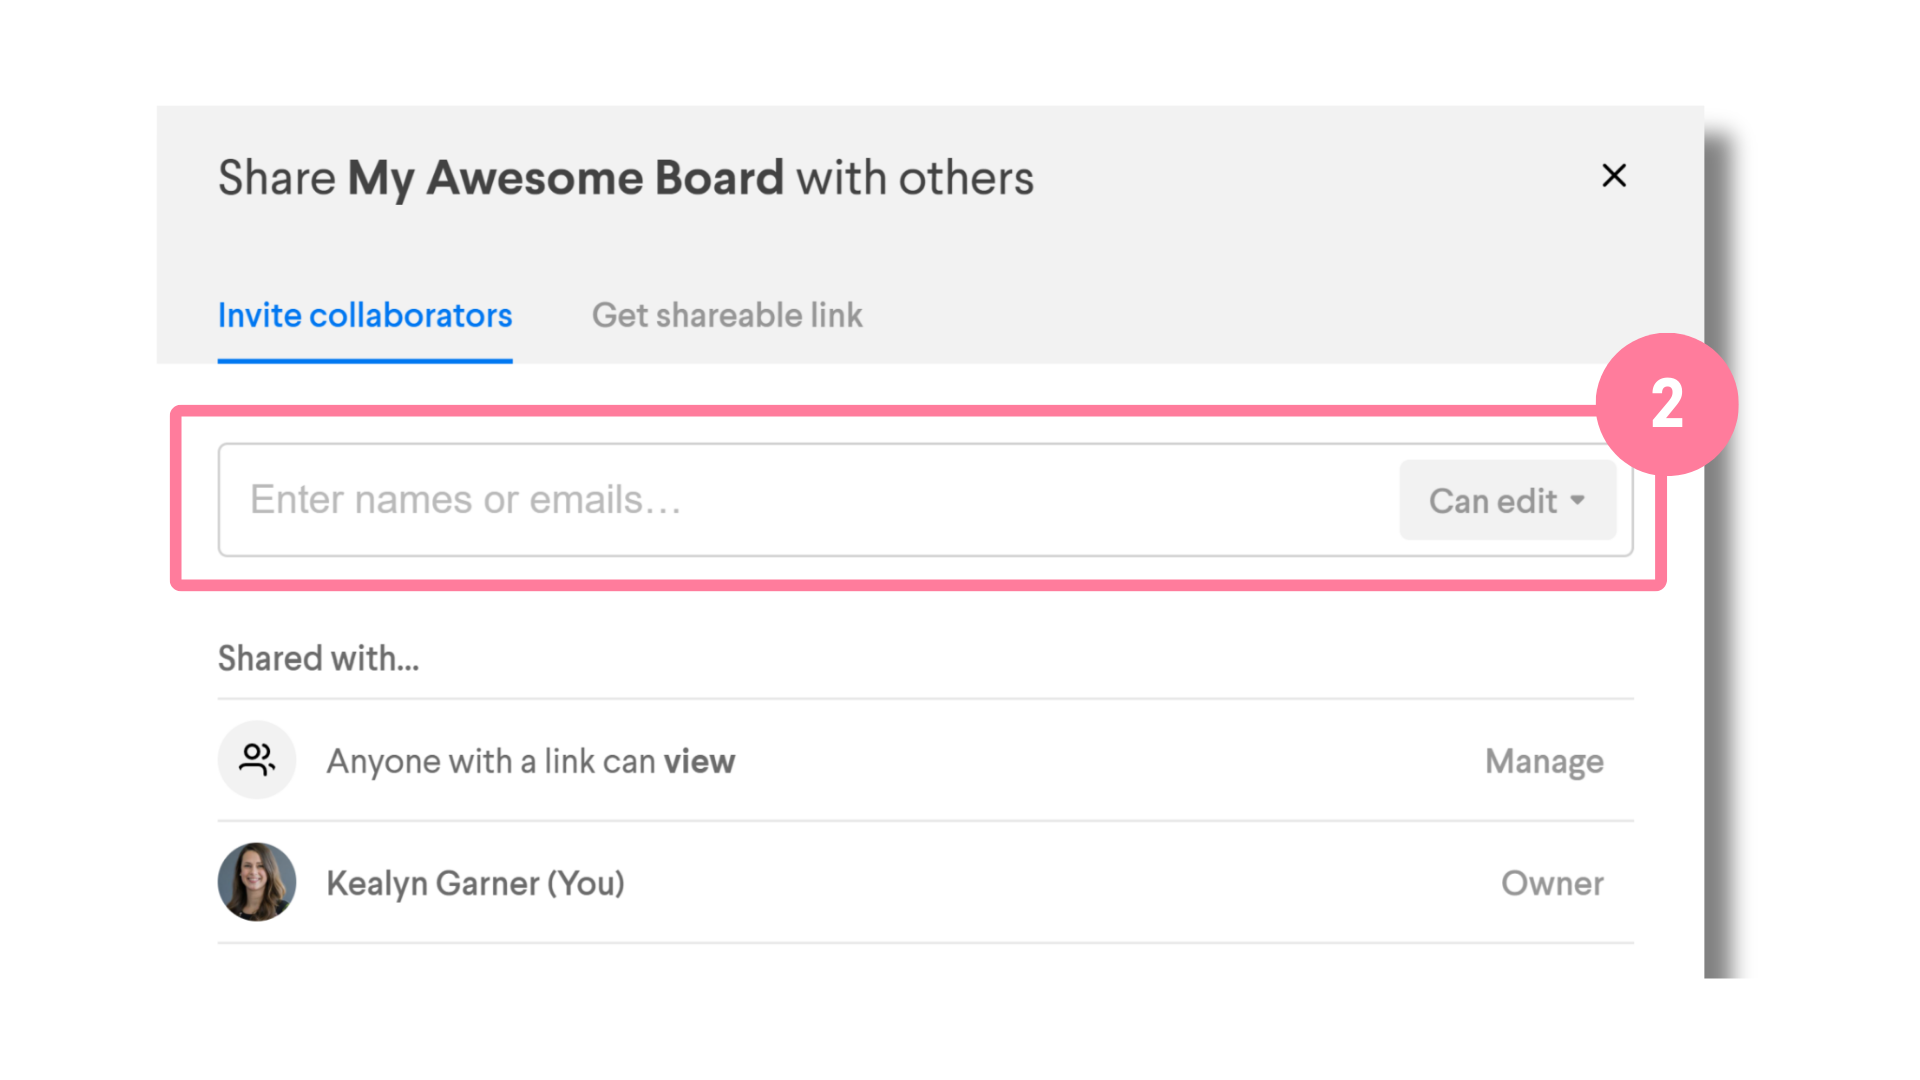
You can invite others to work collaboratively with you on your Whiteboard. Start by clicking the share button in the top right corner of your board, enter their name or email address in the ‘Invite Collaborator’ bar at the top of the modal, adjust their level of access, and press enter. An email with a link to the board will be sent to the collaborator and the map will appear on their Whiteboard homepage under their ‘Shared with me’ section.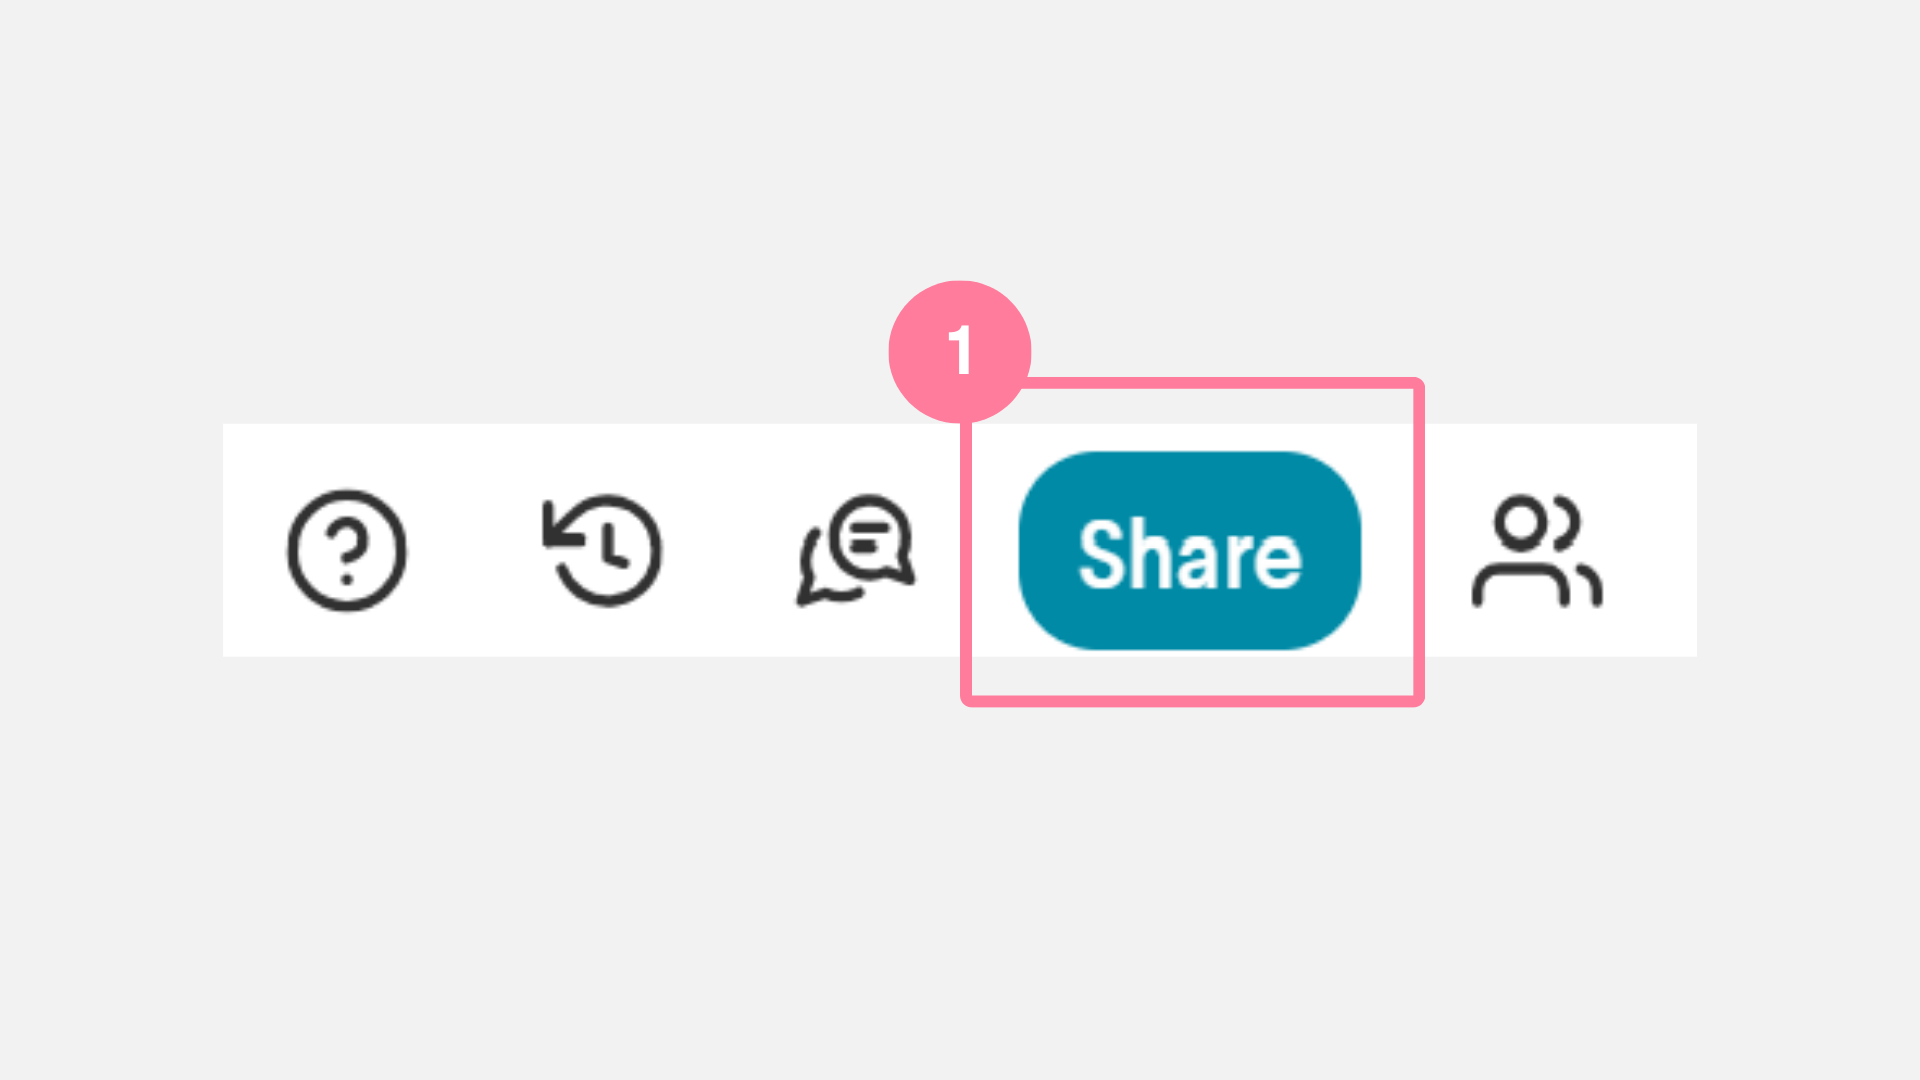
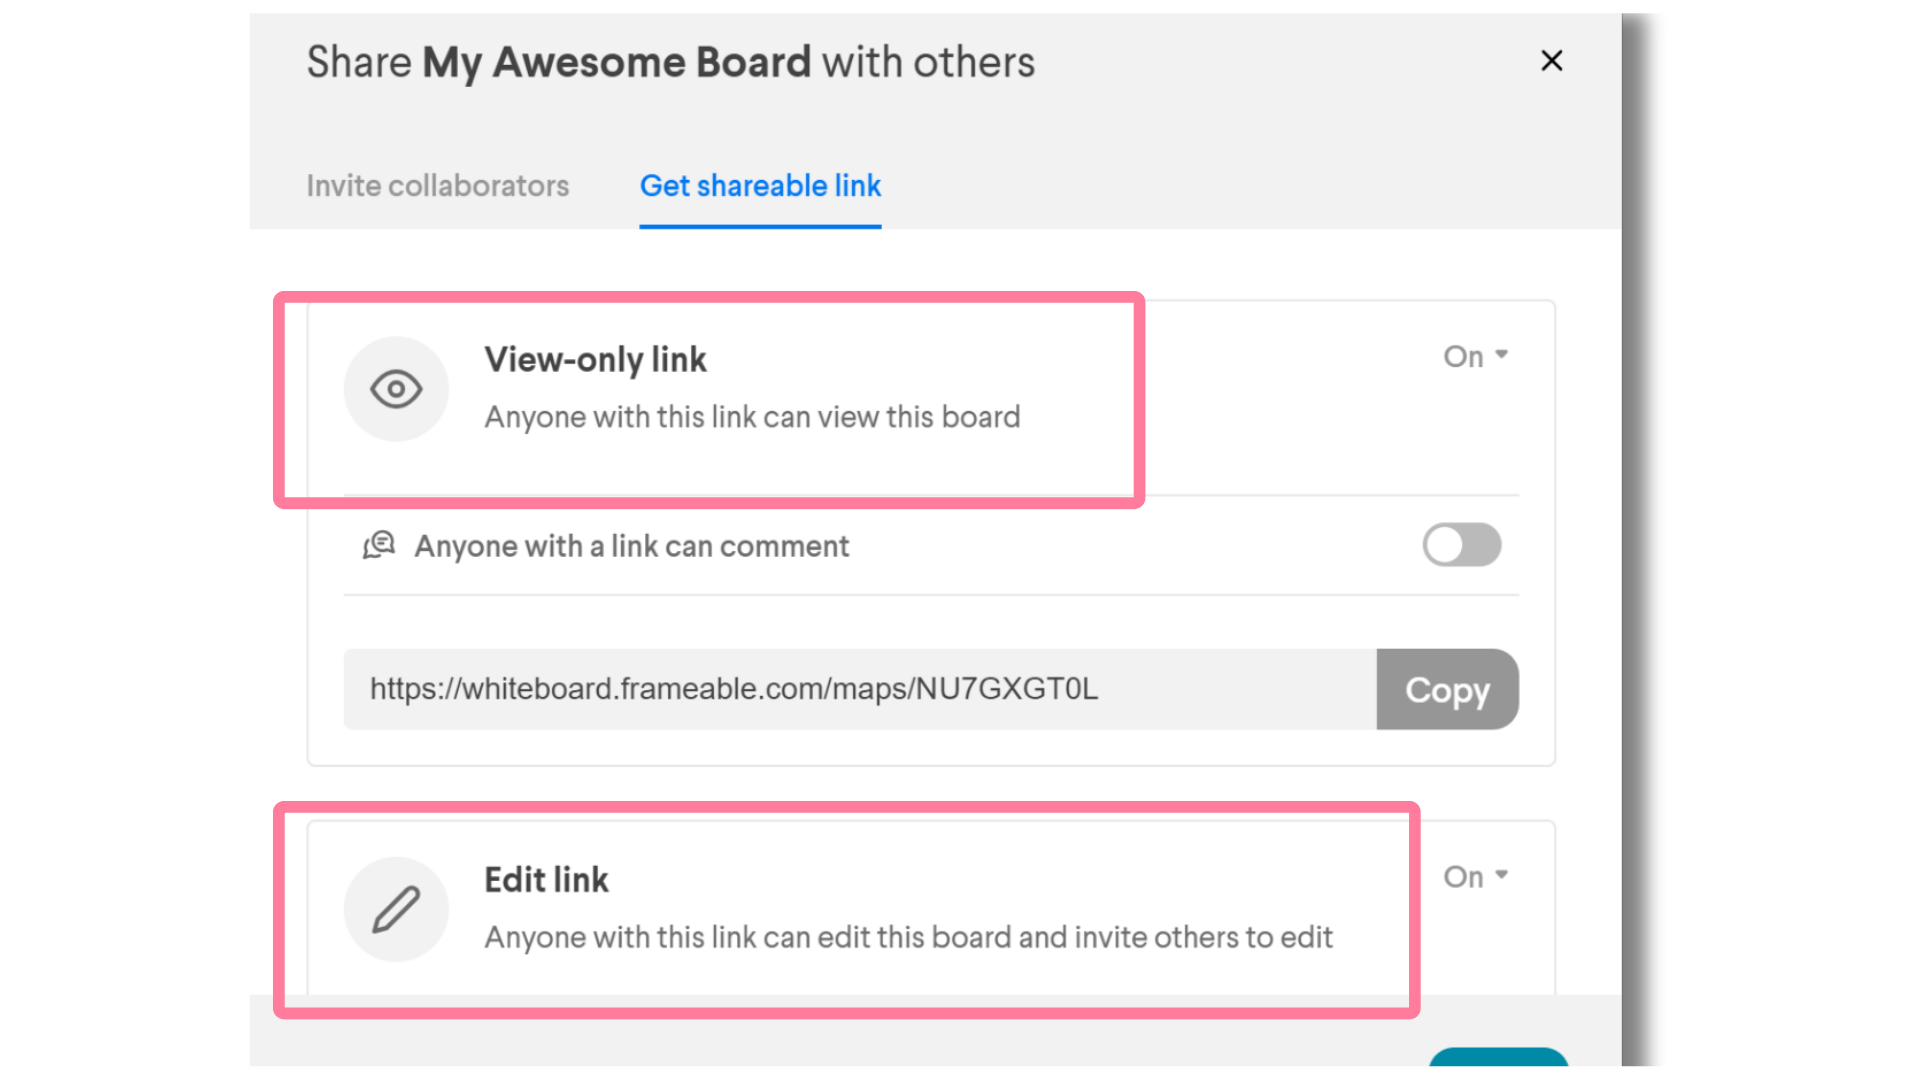
Adjusting access settings
Default board access is set to ‘Anyone who has the link can view and edit.’ Adjustments to these access settings must be adjusted on a per board basis.
You can control the general access settings to your map by clicking share in the top right corner of your board and click ‘manage’ under ‘Shared with…’ This will bring you to a settings page that allows you to adjust permissions around how others can interact with your map.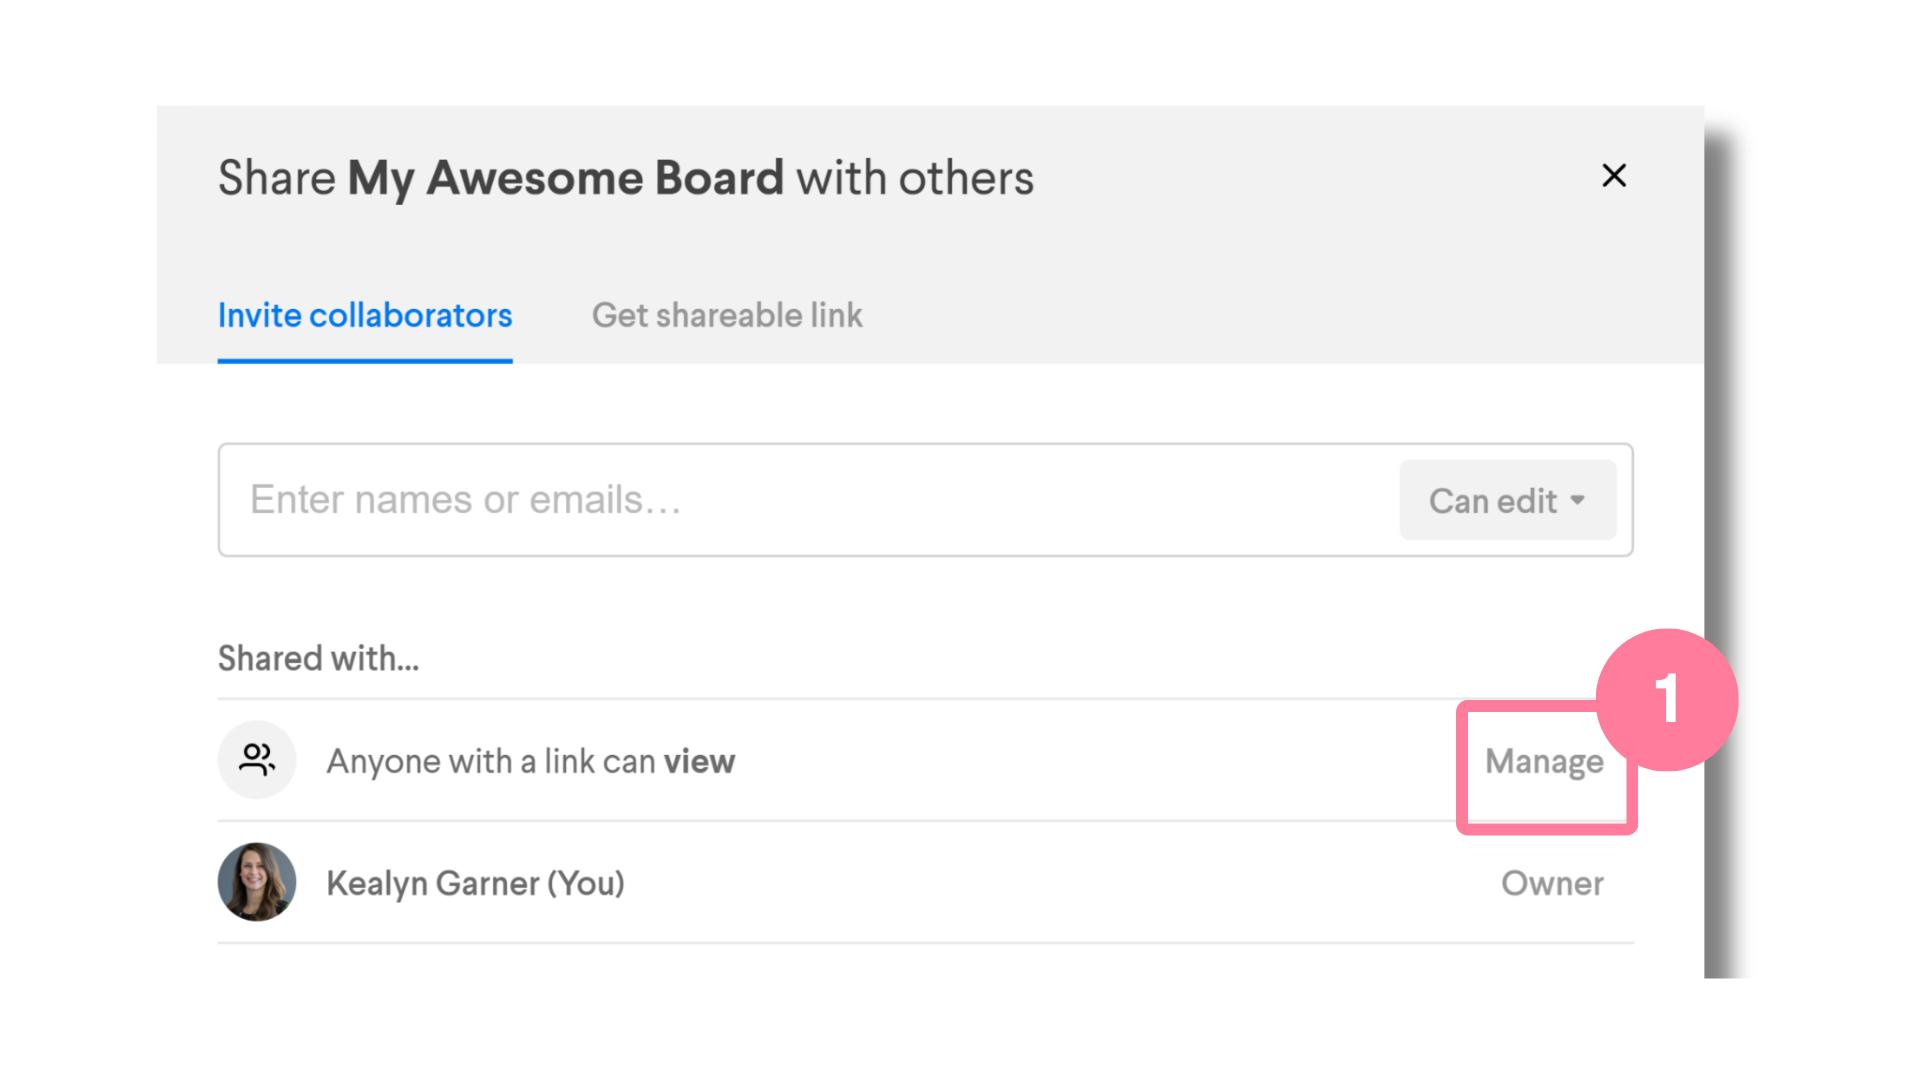
![]()
Conclusion
As we are continuously striving to improve and polish our products, product updates are posted as soon as they become available and incorporated into user guides on a continuous basis. Check back often for the latest updates!
Feedback and feature requests
Please let us know what you think! Our mission centers on making your virtual work and collaboration effortless, which is why client feedback is so vital to our work. If you have any feedback, we would love to hear from you! Email us at any time at support@frameable.com.![]()
Need help?
We’re here to assist you with your Frameable questions!
Email us at: support@frameable.com
Call Us: 646-710-1703